It might be necessary to update the RAM settings for vScope to optimize performance. The initial RAM setting that vScope uses is set during the installation and controls how much of the system RAM that vScope is allowed to use.
vScope will always benefit from adding more RAM to the server but sometimes it is also necessary to update the vScope RAM setting to adjust how much system RAM vScope is allowed to use. Never allocate all system RAM to vScope.
Recommended combinations:
Total server RAM: 12 GB, vScope 8 GB
Total server RAM: 16 GB, vScope 12 GB
Total server RAM: 24 GB, vScope 16 GB
Total server RAM: 32 GB, vScope 24 GB
Total server RAM: 48 GB, vScope 36 GB
RAM setting can be changed by either running the installer (no worries, your vScope data is not affected) or by editing the Windows registry:
1. Run installer
- Stop the vScope service
- Run the latest installer of vScope. Download installer here.
- Do the advanced installation by uncheck “Express Installation”
- Set the dedicated RAM under the vScope Core Settings
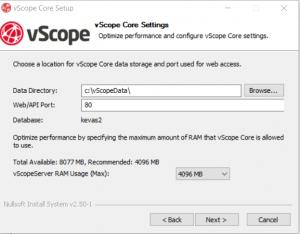
- Finish the installation and start the vScope service again. (Make sure that the data directories matches the current installation settings)
- Done!

2. Edit the registry
- Stop the vScope service
- Run regedit.exe and search for the key:
HKEY_LOCAL_MACHINE\SOFTWARE\WOW6432Node\Apache Software Foundation\Procrun 2.0\vScopeServer\Parameters\Java
- Right click the key named Options and select Modify…
- Current value might look like below:
-Xmx4096m
-XX:MaxPermSize=256m
- To change the RAM, edit the setting called -Xmx. To change RAM from 4GB (like above) to 8 GB:
-Xmx8192m
-XX:MaxPermSize=256m
- Click OK, exit regedit and re-start the vScope service. vScope will now use the updated RAM setting.