vScope is based on a unique data collection engine that not only gathers and structures data. It also automatically correlates resources from several different technologies into a virtual map showing the complete datacenter set up. You can then browse this map in vScope’s intuitive UI. Another great way to make use of vScope’s data collection is to integrate it with existing systems such as the service management software ServiceNow.
In this guide we will use the vScope REST API to import virtual machines and ESX virtualization hosts from a vScope table into ServiceNow CI’s (Configuration Items). We will also import the relationships between the hosts and the virtual machines.
Overview
These are the general steps needed to setup vScope and ServiceNow integration.
vScope Steps
- Create an vScope API token for use with ServiceNow
- Create a table in vScope listing the virtual machines you want to import to ServiceNow
- Create a table in vScope listing the virtualization hosts you want to import to ServiceNow
ServiceNow Steps
- Create a Data Source in ServiceNow to import the virtual machines
- Create a Transformation Map in ServiceNow to transform the imported Virtual Machines to CI’s
- Create a Data Source in ServiceNow to import the virtualization hosts
- Create a Transformation Map in ServiceNow to transform the imported Virtualization Hosts to CI’s
- Create a Data Source in ServiceNow to import the relationships between virtual machines and virtualization hosts.
- Create a Transformation Map in ServiceNow to transform the imported relationships
First step: Create a vScope API token
ServiceNow needs to access the vScope API with a token which is appended as a query parameter to each API request.
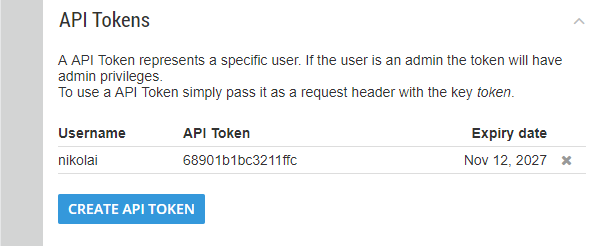
- In vScope: Settings -> API Tokens
- Click Create API Token and select the user which will be used in ServiceNow. Make note of the expiry date. Also, make sure the user you select here has READ access to all the tables you will use with ServiceNow.
Create a table in vScope for Virtual Machines
Create a table in vScope listing the virtual machines you want to import into ServiceNow:
- Table Explorer -> New Table -> Virtual Machines
- Add the column UUID. Very important.
- Add any other columns you want to import into ServiceNow like RAM and CPU Total.
- Click Save Table to save the table. Name it so you can recognize that it is being used by ServiceNow.

- Click Collaborators and copy the last part of the permalink. This is the ID of the table. In the example below the ID is 1510149391850.

- Make sure the vScope user that you will use from ServiceNow has minimum READ access to the table.
Create a table in vScope for Virtualization Hosts
The steps here are similar to those for creating a table for Virtual Machines.
Create a table in vScope listing the virtualization hosts you want to import into ServiceNow:
- Table Explorer -> New Table -> Virtualization Hosts
- Add the column UUID. Very important.
- Add any other columns you want to import into ServiceNow like RAM and CPU Total.
- Click Save Table to save the table. Name it so you can recognize that it is being used by ServiceNow.
- Click Collaborators and copy the last part of the permalink. This is the ID of the table. In this example the ID is 1510574599974.
- Make sure the user in vScope that you will use from ServiceNow has at least READ access to the table.
Create a Data Source in ServiceNow for vScope Virtual Machines
Data Sources are means get data from external sources into ServiceNow import tables. We will now create a Data Source to import the entries from the Virtual Machines table we created earlier.
- In ServiceNow, go to Data Sources and click New. Edit as follows:
- Name: vScope-CS
- Label: vScope
- Import set table name: u_vscope_cs (this is the import table)
- Type: File
- Format: JSON
- Path for each row:
/rows/rows - File retrieval method:
HTTPorHTTPS(depending on your vScope setup) - Server: {your vscope server address} (example: customer.vscope.net)
- File path:
/rest/v1/tables/1510149391850/data/json?token={your api token}- Make sure 1510149391850 is the ID of your Virtual Machines table you created earlier
- Replace {your api token} with the API token you created earlier
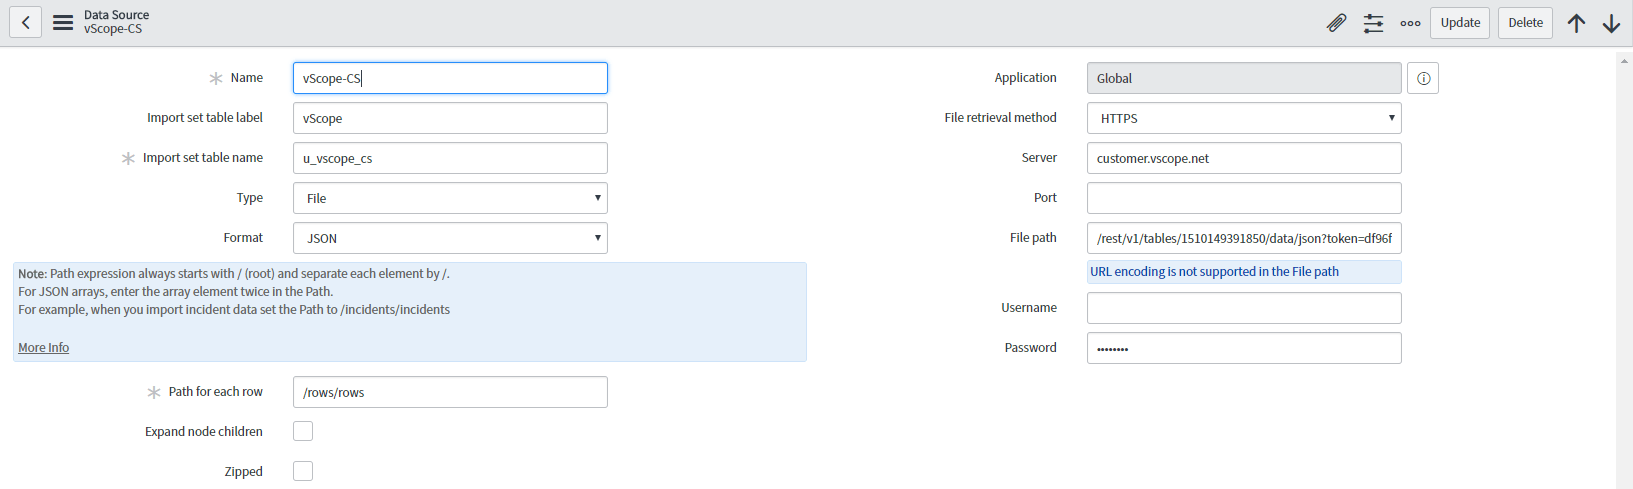
- Click Submit to save the new Data Source
Now we want to actually import data from the data source. Open the vScope-CS data source we just created and click Load All Records.
If successful it will be indicated in green with the number of entries added to the u_vscope_cs import table. If there are any errors here, they are probably access related. Make sure your vScope is accessible from ServiceNow and that you have used the correct API token and table ID.
Next step is to transform the data from the import table (u_vscope_cs) to the cmdb_ci_computer ServiceNow table.
Create a Transform Map in ServiceNow for Virtual Machines
After importing the data to the import table u_vscope_cs we must transform the data in that table into CI’s which we will place in cmdb_ci_computer. Click Create transform map.
- Populate the field as follows for the new transform map:
- Name: vScope-CS
- Source table: vScope-CS (u_vscope_cs)
- Target table: Computer (cmdb_ci_computer)
- Click Submit to save the new transform map.
![]()
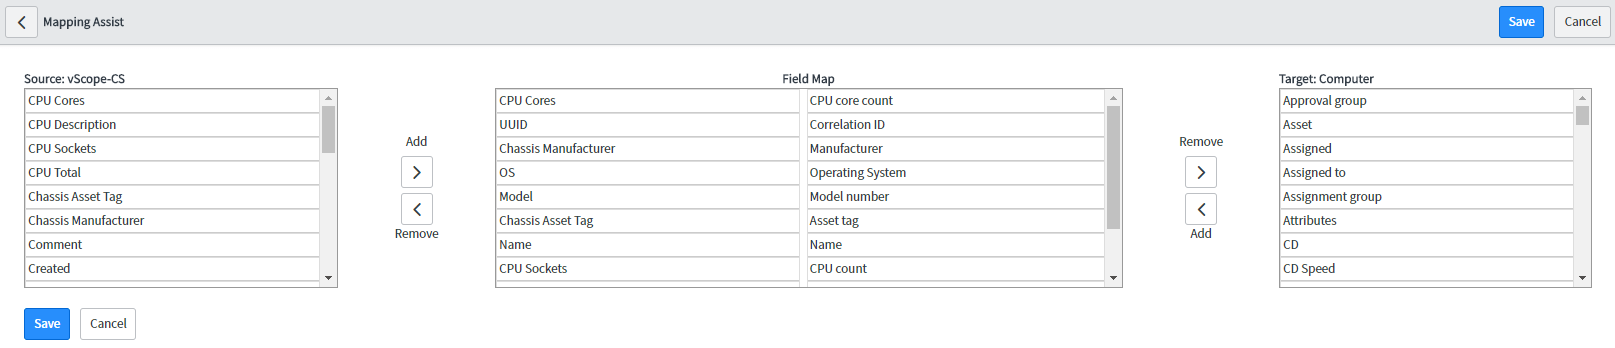
For each row that we transform from the import table u_vscope_cs to the target table cmdb_ci_computer we must choose how fields in the import table should be mapped to fields in the target table. We do this by using the Mapping Assist under Related Links. Click that link.
On the left you have the source import table. In the middle the Field Map where each row corresponds to a mapped field. On the right you have the target table with the available fields.
A suggested basic mapping would be:
- Name -> Name
- UUID -> Correlation ID
- CPU Cores -> CPU core count
- CPU Sockets -> CPU count
Please note the UUID -> Correlation ID mapping. This one is very important as it will allow consistent updates of CI’s every time a new import is performed.
If machineA from vScope is mapped to ServiewNow CI machineA then we want this to be the same every import from vScope. This is where UUID and Correlation ID comes into play.
Click Save to save the mapping. In the Field Maps below, click u_uuid.
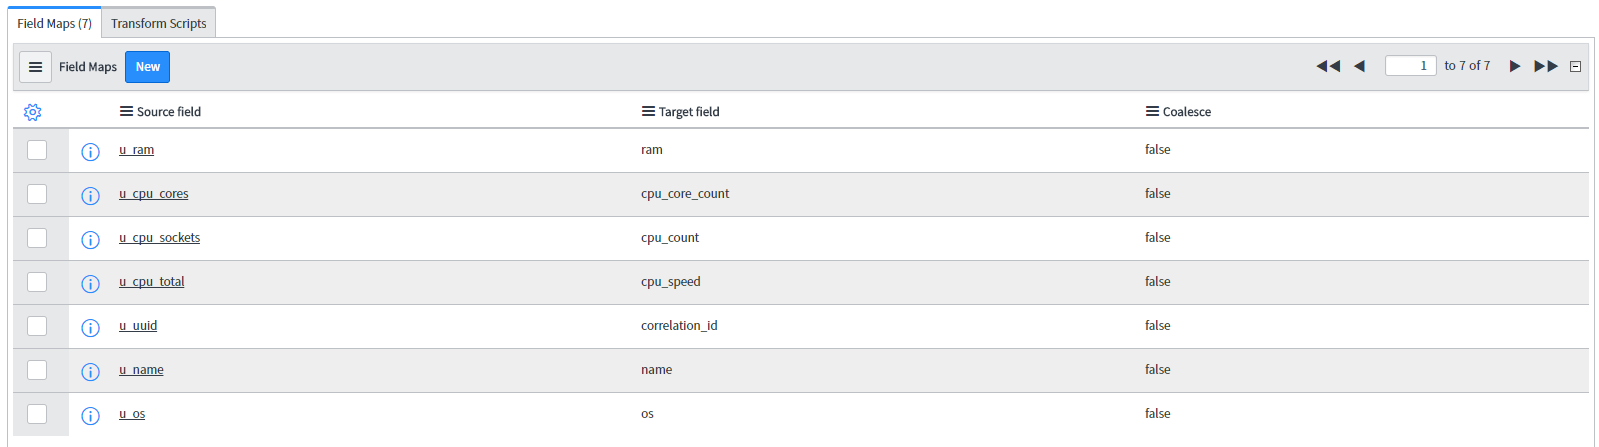
Check the Coalesce checkbox and click Update. Coalesce should now be true in the Field Map.
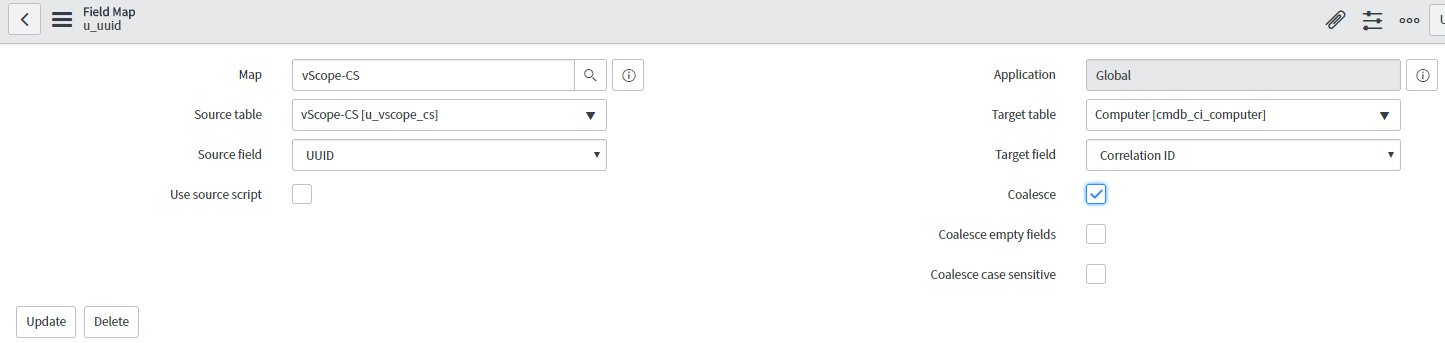
Important: By setting coalesce to true for UUID -> Correlation ID ServiceNow will consider UUID a unique key. When ServiceNow is doing a transform of an import map and a match is found using the coalesce field (UUID->Correlation ID) then an update is performed on that record. Otherwise a new record is created.
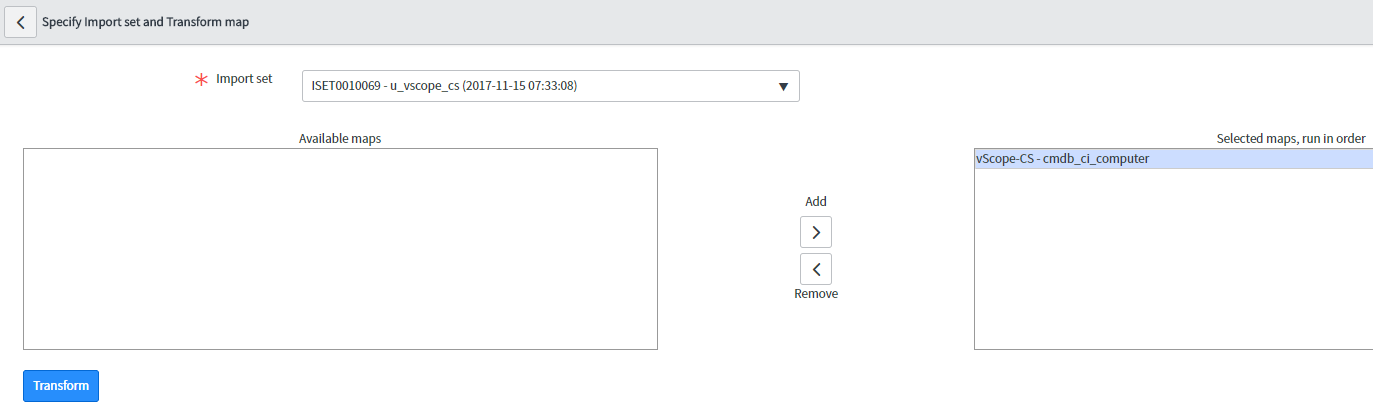
Now we have the necessary steps to transform the data from the import table into the target table so we go ahead and run a transform by clicking Transform under Related Links.
Specify which import set and transform map we want to use for the transform. An import set is just a date stamped import map. Choose u_vscope_cs as the import set and vScope-CS-cmdb_ci_computer as the transform map. Then click Transform.
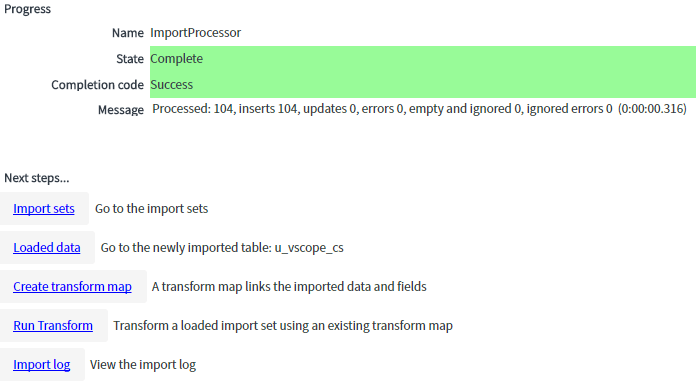
Depending on the size of the import table, the transformation will take more or less time. Successful transformation will be indicated in green as below.
![]()
Click the Transform history step to show the transform history. Here you can see how many entries were inserted, updated or ignored. An example:
total: 104, inserts 0, updates 97, ignored 7, skipped 0, errors 0
This means that 104 entries were processed of which 97 were updates and 7 entries were ignored.
Judging from the results the transformation was successful. To verify that we have CI’s in our Computer table we simply browse to it. Enter Computers into the filter navigator.

Sort by Created to bring the latest CI’s to the top. You should be able to recognize your machines in the table.
The next step is to repeat the process for Virtualization Hosts. We begin by creating a Data Source to import the virtualization hosts from vScope.
Create a Data Source in ServiceNow for vScope Virtualization Hosts
We repeat the steps we did when we created a Data Source for Virtual Machines earlier. The difference here is the import table names and ID of the vScope table.
- In ServiceNow, go to Data Sources and click New. Edit as follows:
- Name: vScope-Host
- Label: vScope
- Import set table name: u_vscope_host (this is the import table)
- Type: File
- Format: JSON
- Path for each row:
/rows/rows - File retrieval method:
HTTPorHTTPS(depending on your vScope setup) - Server: {your vscope server address} (example: customer.vscope.net)
- File path:
/rest/v1/tables/1510574599974/data/json?token={your api token}- Make sure 1510574599974 is the ID of your Virtualization Hosts table you created earlier
- Replace {your api token} with the API token you created earlier
- Click Submit to save the new Data Source
Now we want to actually import data from the data source. Open the vScope-Host data source we just created and click Load All Records.
Successful import will be indicated in green with the number of entries added to the u_vscope_host import table. If there are any errors here, they are probably access related. Make sure your vScope is accessible from ServiceNow and that you have used the correct API token and table ID.
Next step is to transform the data from the import table (u_vscope_host) to the cmdb_ci_esx_server ServiceNow table. You would use cmdb_ci_hyper_v_server if you are importing Hyper-V hosts.
Create a Transform Map in ServiceNow for Virtual Machines
After importing the data to the import table u_vscope_host we must transform the data in that table into CI’s which we will place in cmdb_ci_esx_server. Click Create transform map.
- Populate the field as follows for the new transform map:
- Name: vScope-Host
- Source table: vScope-Host (u_vscope_host)
- Target table: ESX Server (cmdb_ci_esx_server)
- Click Submit to save the new transform map.
For each row that we transform from the import table u_vscope_host to the target table cmdb_ci_esx_server we must choose how fields in the import table should be mapped to fields in the target table. We do this by using the Mapping Assist under Related Links. Click that link.
On the left you have the import table. In the middle the Field Map where each row corresponds to a mapped field. On the right you have the target table with the available fields.
A suggested basic mapping would be:
- Name -> Name
- UUID -> Correlation ID
- CPU Cores -> CPU core count
- CPU Sockets -> CPU count
Click Save to save the mapping.
Again, note the UUID -> Correlation ID mapping. You should always include UUID -> Correlation ID in your transform maps. We also must make sure that the UUID is a unique key by setting coalesce to true for that field.
- In the Field Maps below, click u_uuid
- Check the Coalesce checkbox and click Update. Coalesce should now be true in the Field Map
Now we have the necessary steps to transform the data from the import table into the target table so we go ahead and run a transform by clicking Transform under Related Links.
Specify which import set and transform map we want to use for the transform. An import set is just a date stamped import map. Choose u_vscope_host as the import set and vScope-Host-cmdb_ci_esx_server as the transform map. Then click Transform.
Again, use the transformation history to discover any problems.
To verify that we have CI’s in our ESX table we simply browse to it. Enter ESX into the filter navigator.

Sort by Created to bring the latest CI’s to the top. You should be able to recognize your ESX hosts in the table.
Create a Data Source in ServiceNow to import relationships
At this stage we have imported the Virtual Machines to ServiceNow and transformed them into Computer CI’s. We have also imported ESX Virtualization Hosts to ServiceNow and transformed them into ESX CI’s.
Now we want to connect the virtualization hosts and the virtual machines hosted by them. The first step is to use the vScope API to find out the API call we should make from ServiceNow.
Make sure you are logged into vScope with a valid user and browse to the vScope API documentation:
https://vscope.your.domain/apidoc/
- Find the v1 section and expand it
- Find the endpoint
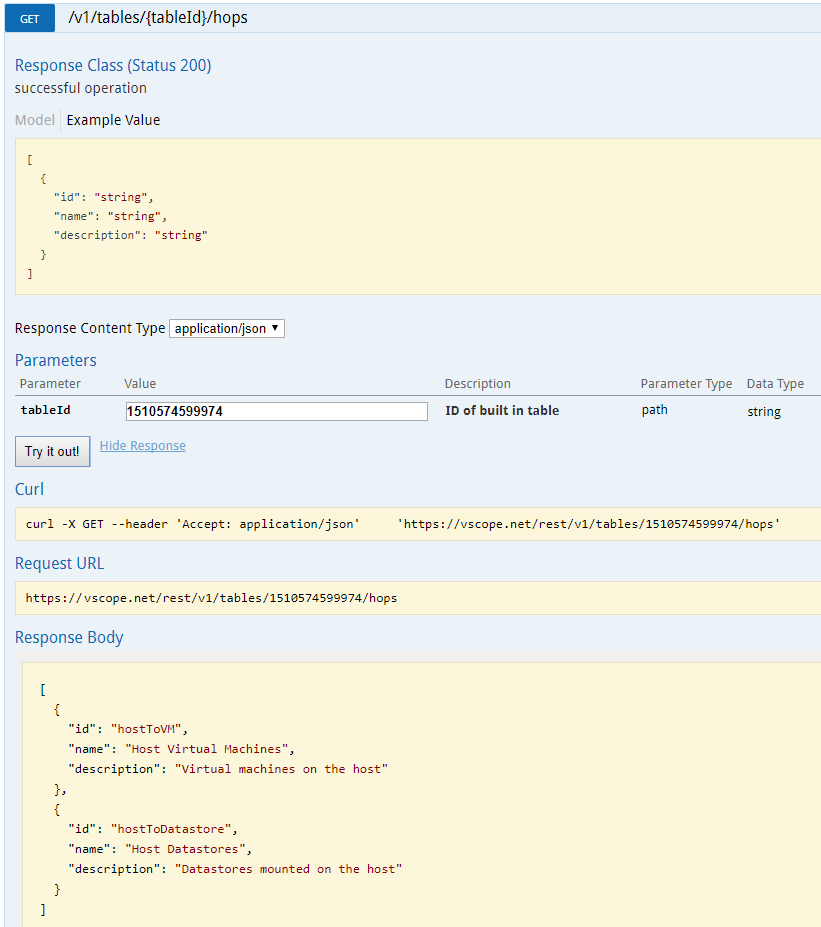
GET /v1/tables/{tableId}/hopsand expand it - In the
tableIdfield, enter the ID of the Virtualization Hosts table we created earlier:1510574599974 - Click Try it out!
The response is a list of valid hops that you can make from the Virtualization Hosts table. A hop is basically a traversal from one resource to a related resource. Valid hops from our table are:
- hostToVm – The hosted virtual machines
- hostToDatastore – Mounted datastores
The first hop is the one we want to use.
Next, expand the endpoint GET /v1/tables/{tableId}/hops/{hopId}
This is where we try out the hop we want to make. Fill in the parameter fields as follows:
- tableId: 1510574599974
- hopId: hostToVM
- Leave hopName empty for now
Click Try it out! to perform the hop. The result will be a list of sourceUUID/targetUUID combinations:
{
  "rows": [
    {
      "sourceUUID": "MDA3NzAwMWUtOGMwMC0wMGJjLWE5NTktOTBlNmJhZjMyYzNi",
      "hopID": "hostToVM",
      "hopName": "Host Virtual Machines",
      "targetUUID": "NTY0ZDhkNTAtZDdiYi03ODliLWZlOTAtMzcyZjYxNTYwMWM3"
    },
    {
      "sourceUUID": "MDA3NzAwMWUtOGMwMC0wMGJjLWE5NTktOTBlNmJhZjMyYzNi",
      "hopID": "hostToVM",
      "hopName": "Host Virtual Machines",
      "targetUUID": "NTY0ZDUyOGMtNDk4MC0xZGVmLWMzNDYtYWRjMzU4MzBiZGM1"
    }
  ]
}
The sourceUUID is the UUID of the source element which is a Virtualization Host (tableId is the Virtualization Hosts table).
The targetUUID is the UUID of the target element connected to the source element. The target element is a Virtual Machine since we are performing a hostToVM hop.
Now back to the hopName field which we left empty earlier. This is an optional field which allows you to name the hop. If left empty it just uses the default name (Host Virtual Machines).
ServiceNow has a list of predefined CI Relation Types. In ServiceNow, type in CI Relation Types into the filter navigator.

A list of relationship types will appear. Find the one with Parent Descriptor = Hosted On. Click on it to bring up details.

This is the relationship we want to use. Make note of the name at the top: Hosted on::Hosts. This is the ID of the relationship type.
Enter that into the hopName field in the vScope API and hit Try it out! again. You will now see that hopName in the output is now Hosted on::Hosts.
Go back to Data Sources in ServiceNow. Click New. Fill in the form as follows:
- Name: vScope-Host-VM-Rel
- Import set table label: vScope
- Import set table name: u_vscope_host_vm_rel
- Type: File
- Format: JSON
- Path for each row:
/rows/rows - File retrieval method:
HTTPorHTTPS(depending on your vScope setup) - Server: {your vscope server address} (example: customer.vscope.net)
- File path:
/rest/v1/tables/1510574599974/hops/hostToVM?hopName=Hosted on::Hosts&token={your api token}- Make sure 1510574599974 is the ID of your Virtualization Hosts table you created earlier
- Replace {your api token} with the API token you created earlier
- Make sure you don’t do any URL encoding in this field! Leave spaces as spaces, do not encode them.
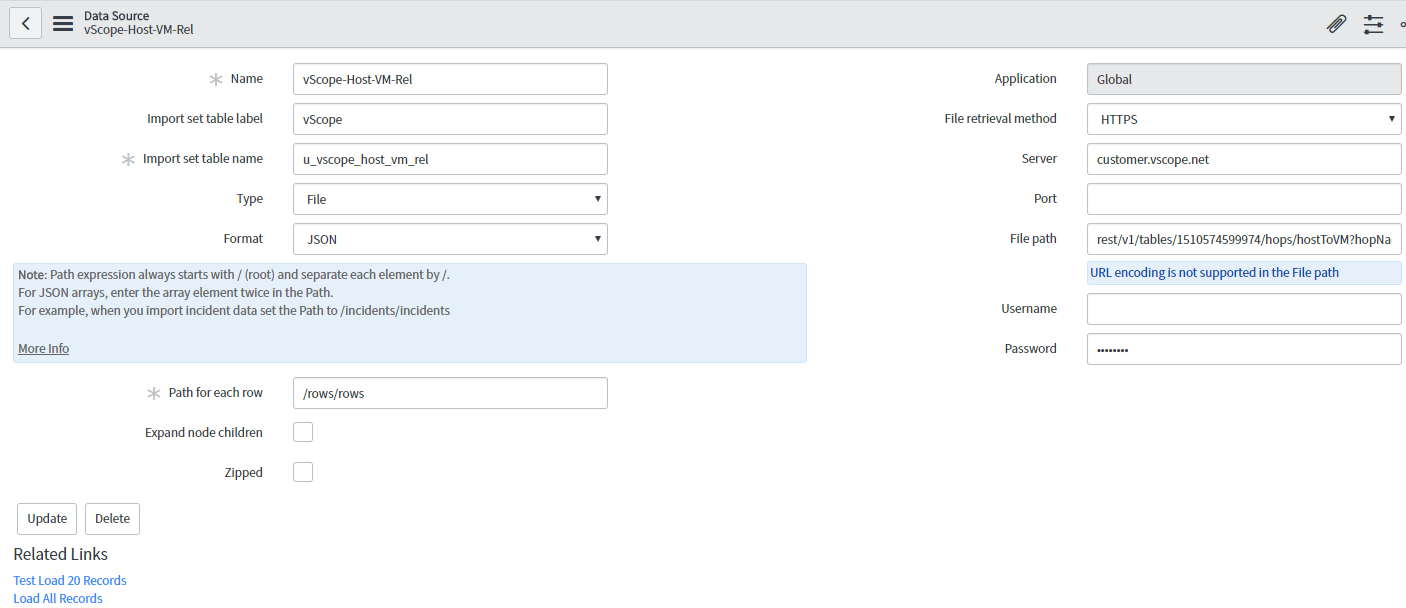
- Click Submit to save the new Data Source
Now we want to actually import data from the data source. Open the vScope-Host-VM-Rel data source we just created and click Load All Records.
If successful it will be indicated in green with the number of entries added to the u_vscope_host_vm_rel import table.
Next step is to transform the data from the import table (u_vscope_host_vm_rel) to the cmdb_rel_ci ServiceNow table. The cmdb_rel_ci table in ServiceNow contains relationship information between CI’s.
Create a Transform Map in ServiceNow for Host/VM relationships
After importing the relationship data to the import table u_vscope_host_vm_rel we must transform the data in that table into relationships between CI’s which we will place in cmdb_rel_ci . Click Create transform map.
- Populate the field as follows for the new transform map:
- Name: vScope-Host-VM-Rel
- Source table: vScope-Host-VM-Rel (u_vscope_host_vm_rel)
- Target table: CI Relationship (cmdb_rel_ci)
- Click Submit to save the new transform map.
Next, we need to map the fields in the u_vscope_host_vm_rel to fields in cmdb_rel_ci. Click Mapping Assist and setup the following mappings:
- u_sourceuuid -> parent
- u_targetuuid -> child
- u_hopname -> type
No need to coalesce on any field.

Here’s the part that differs from the previous transform maps we have set up for virtualization hosts and virtual machines. We must add a Transform Script which will do some extra processing during the transformation.
The script will do lookup of the u_sourceuuid (Host UUID) and u_targetuuid (VM UUID) fields to match the endpoints of the relationship to existing CI’s. Basically the script will do the following:
- For u_sourceuuid, find a host CI in the cmdb_ci_esx_server table which has a matching value in the field correlation_id. Remember, this is where we mapped the u_uuid field for Hosts and VMs earlier. Remember the sys_id for this CI.
- For u_targetuuid, find a virtual machine CI in the cmdb_ci_computer table which has a matching value in the field correlation_id. Remember the sys_id for this CI.
- Create a relationship between the host CI and the virtual machine CI using sys_id which is the unique identifier used by ServiceNow for CI’s.
Here’s an example to visualize what is happening.
Entry in u_vscope_host_vm_rel:
u_sourceuuid: MDA3NzAwMWUtOGMwMC0wMGJjLWE5NTktOTBlNmJhZjMyYzNi
u_hopid: hostToVM
u_hopname: Hosted on::Hosts
u_targetuuid: NTY0ZDhkNTAtZDdiYi03ODliLWZlOTAtMzcyZjYxNTYwMWM3
Do a search in cmdb_ci_esx_server for correlation_id = MDA3NzAwMWUtOGMwMC0wMGJjLWE5NTktOTBlNmJhZjMyYzNi
This search resolves to the ESX host ESX1 which has sys_id = ABC123
Do a search in cmdb_ci_computer for correlation_id = NTY0ZDhkNTAtZDdiYi03ODliLWZlOTAtMzcyZjYxNTYwMWM3
This search resolves to the VM VM1 which has sys_id = DEF456
Create an entry in the cmdb_rel_ci table:
child: ABC123 (the Host sys_id)
parent: DEF456 (the VM sys_id)
type: Hosted on::Hosts
If one was to read convert the relationship into human readable form it would read out as:
VM DEF456 is hosted on Host ABC123
or:
Host ABC123 hosts VM DEF456
The transform script
Here’s the actual transform script used to transform the host/vm relations. Add this script through the Transform Scripts tab by clicking New.
![]()
Set up as follows:
- When: onBefore (decides when the script is run, very important)
Script: {enter the script contents below}
![]()
Script contents
(function runTransformScript(source, map, log, target /*undefined onStart*/ ) {
 // Tell SN to ignore this row (we will add it manually)
 ignore = true;

 // CI tables to search when trying to resolve sourceuuid and targetuuid to correlation_id
 var ci_tables = ["cmdb_ci_computer", "cmdb_ci_esx_server"];

 // Which fields contains the child and parent correlationIds
 var childCorrelationIdColumn = "u_sourceuuid";
 var parentCorrelationIdColumn = "u_targetuuid";

 // Resolve CI's
 var childSysId = null;
 for (var i=0, len = ci_tables.length; i < len; i++) {
  var childGlide = new GlideRecord(ci_tables[i]);
  childGlide.addQuery('correlation_id', source.getValue(childCorrelationIdColumn));
  childGlide.query();
  while (childGlide.next()) {
   childSysId = childGlide.getValue('sys_id');
  }
  if (childSysId != null)
   break;
 }

 var parentSysId = null;
 for (i=0, len = ci_tables.length; i < len; i++) {
  var parentGlide = new GlideRecord(ci_tables[i]);
  parentGlide.addQuery('correlation_id', source.getValue(parentCorrelationIdColumn));
  parentGlide.query();
  while (parentGlide.next()) {
   parentSysId = parentGlide.getValue('sys_id');
  }
  if (parentSysId != null)
   break;
 }

 // Endpoints found
 if (parentSysId != null && childSysId != null) {

  // Make sure relationship does not already exist between endpoints
  var relGlide = new GlideRecord("cmdb_rel_ci");
  relGlide.addQuery('parent', parentSysId);
  relGlide.addQuery('child', childSysId);
  relGlide.query();
  var relExists = false;
  while (relGlide.next()) {
   relExists = true;
  }

  // Relationship does not already exist, we need to create it
  if (!relExists) {
   // Find the relationship we are adding
   var relSysId = null;
   var reltype = new GlideRecord("cmdb_rel_type");
   reltype.addQuery('name', source.u_hopname);
   reltype.query();
   while (reltype.next()) {
    relSysId = reltype.getValue('sys_id');
   }

   // Could not find relationship by hopName
   if (relSysId == null) {
    log.info("Skipped " + source.u_sourceuuid + " " + source.u_hopname + " " + source.u_targetuuid + ": Missing relationship: " + source.u_hopname);
   }
   else {
    log.info("Adding " + source.u_sourceuuid + " " + source.u_hopname + " " + source.u_targetuuid);
    var rel = new GlideRecord("cmdb_rel_ci");
    rel.initialize();
    rel.parent = parentSysId;
    rel.child = childSysId;
    rel.type = relSysId;
    rel.insert();
   }
  }
  else
   log.info("Skipped " + source.u_sourceuuid + " " + source.u_hopname + " " + source.u_targetuuid + ": Already exists");
  }
 else {
  log.info("Skipped " + source.u_sourceuuid + " " + source.u_hopname + " " + source.u_targetuuid + ": Failed to map endpoints");
 }
})(source, map, log, target);
Script variables
There are three lines in the script that should be customized if you choose to import relationships for other CI’s other than ESX hosts and computers. These lines are highlighted in blue.
- var ci_tables = [“cmdb_ci_computer”, “cmdb_ci_esx_server”];
This controls which ServiceNow CI tables should be searched when trying resolve the u_sourceuuid and u_targetuuid values into CI sys_id values. Basically, these are the tables that contain the endpoints of the relationship.
- var childCorrelationIdColumn = “u_sourceuuid”;
This controls which field contains the child of the relationship. In the Hosted on::Hosts relationship the virtualization host is the child of the relationship. The host UUID exists in the u_sourceuuid field.
- var parentCorrelationIdColumn = “u_targetuuid”;
This controls which field contains the parent of the relationship. In the Hosted on::Hosts relationship the virtual machine is the parent of the relationship. The virtual machine UUID exists in the u_targetuuid field.
Perform transform
Save the script and then click Transform in the Table Transform Map editor. Select an import set (u_vscope_host_vm_rel) and a transform map (vScope-Host-VM-Rel – cmdb_rel_ci) and click Transform.
Once again, success will be indicated in green and use the transform history to look for any errors.
There should be entries similar to this when relationships are added:
Adding MDA3NzAwMWUtOGMwMC0wMGJjLWE5NTktOTBlNmJhZjMyYzNi Hosted on::Hosts NTY0ZDBjN2UtMzI0Yi0xOThjLTAwNDctNWM0MjYyYzhmMDBlAdding MDA3NzAwMWUtOGMwMC0wMGJjLWE5NTktOTBlNmJhZjMyYzNi Hosted on::Hosts NTY0ZDE1ZjctMzg3Ny05YjdkLTFjOWEtNDFhZDI1MTU4YTc4
Transform errors
If there are errors such as:
Skipped MDA3NzAwMWUtOGMwMC0wMGJjLWE5NTktOTBlNmJhZjMyYzNi Hosted on::Hosts NTY0ZDE1ZjctMzg3Ny05YjdkLTFjOWEtNDFhZDI1MTU4YTc4: Failed to map endpoints
It means that the endpoints could not be mapped. Make sure that you have specified the correct CI tables in the script variable ci_tables.
Also, there is a known issue in ServiceNow where it truncates import table fields to max 40 characters. This can happen to u_uuid, u_sourceuuid and u_targetuuid fields which means that they will be incomplete and matching cannot be done. The workaround for this is to delete the import tables (they will be automatically recreated during the next import). When the tables are recreated ServiceNow should identify the length of the incoming data and set the limits accordingly.
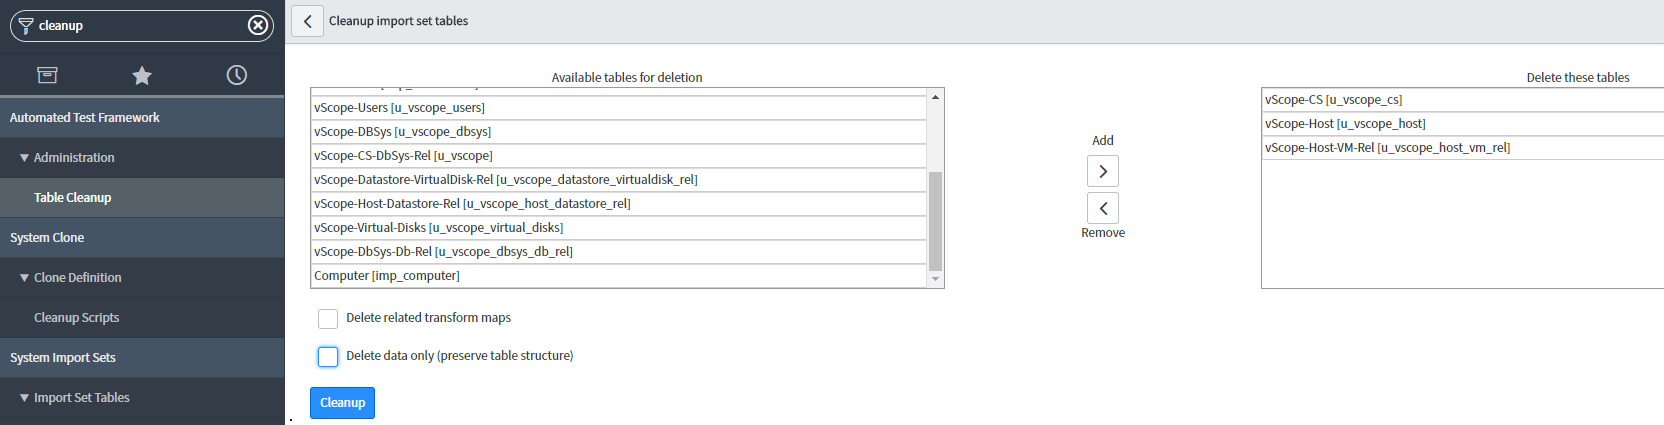
To remove the import tables, enter cleanup into the filter navigator.
Move the following tables into the Delete these tables list:
- vScope-CS (u_vscope_cs)
- vScope-Host (u_vscope_host)
- vScope-Host-VM-Rel (u_vscope_host_vm_rel)
Make sure Delete data only (preserve table structure) is not checked. We want to force the recreation of the table structure.
Click Cleanup to perform the cleanup.
For all tables you just deleted, run an import and then transformation to refresh the data in your CI tables.
Important
There are a few key things to remember when importing data from vScope and transforming the data in ServiceNow.
- Always include the UUID column in your vScope tables that you will import into ServiceNow
- Always map the import table field u_uuid (UUID) to correlation_id (Correlation ID) in the ServiceNow CI table.
- Always coalesce on the u_uuid / correlation_id field to use that field as the unique key for each CI.
- When importing relationships, customize the script to search the correct ci_tables for relationship endpoints.
- When importing relationships, make sure the u_hopname field contains a Relation Type that exists in Serivice Now (like Hosted on::Hosts).
- Transforming relationships must always happen after the endpoints have been transformed. If the endpoints have not been transformed, the relationship transformation will not find them and will not be able to create the entry in the cmdb_rel_ci table.
Viewing relationships
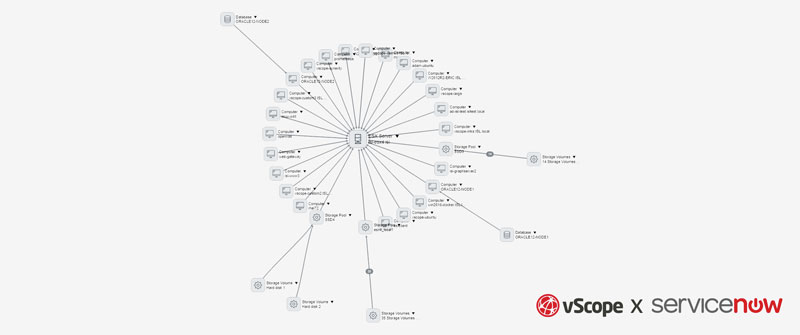
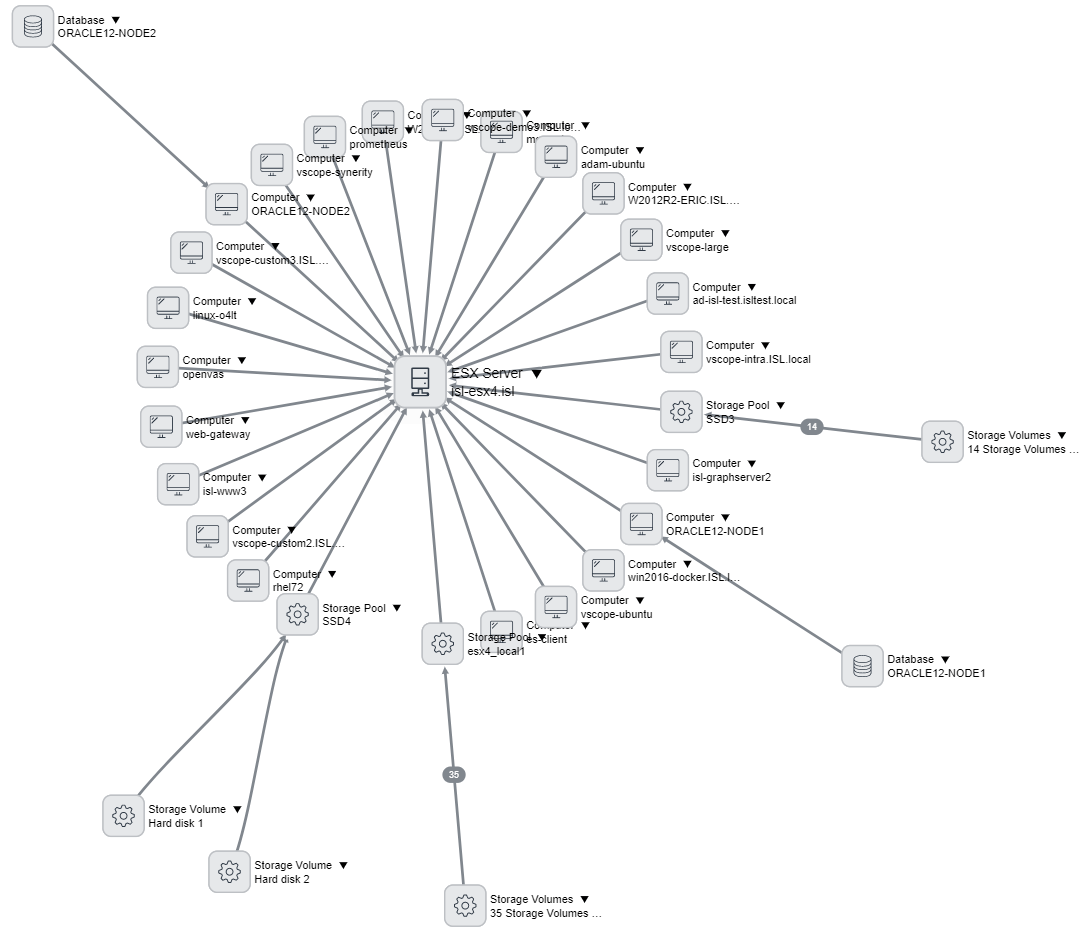
After successfully importing CI’s and CI relationships from vScope to ServiceNow it is possible to view them. If you click one of the ESX servers we have imported and transformed (in this example isl-esx4) you will be able to see the relationships in the Related Items section.
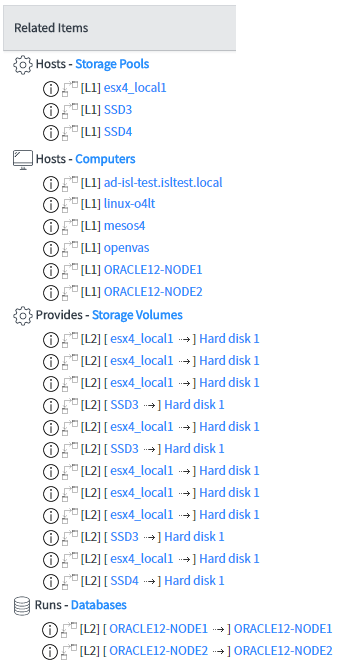
In our example above we have also imported Datastores, Virtual Disks, Database instances and Database catalogs from vScope.
Here’s another way to visualize it. Click ![]() next to Related Items to bring up a graph visualization.
next to Related Items to bring up a graph visualization.
Scheduling import
Once the data sources and transform maps have been configured it is possible to schedule the import. Adjust the scheduled run time so that is coincides with the discovery being finished in vScope. This ensures that you will get the latest data imported into ServiceNow.
Create a scheduled import in ServiceNow for Virtual Machines
To create a scheduled import, enter scheduled imports into the filter navigator.
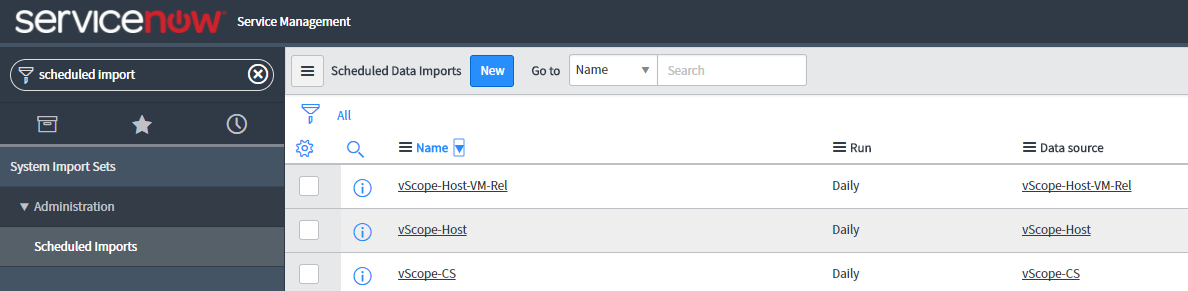
Click New to create a new import. Configure the import as follows:
- Name: vScope-CS
- Data source: vScope-CS
Choose a user to run as and schedule the run. The default settings is Daily at 00:00. If your vScope discovery usually finishes at 03:00 every night, schedule the import in ServiceNow for 03:30.

Click Submit to save the new Scheduled Import. You can then click the newly saved scheduled import and click Execute Now to run the import immediately to test it out. Check the Transform History to make sure that the import and transformation went well.
Create a scheduled import in ServiceNow for Virtualization Hosts
The steps here are the same as in the previous import. The only difference here is the data source which should be vScope-Host instead of vScope-CS. The scheduled time can also be the same.
Create a scheduled import in ServiceNow for Host/VM relationships
This is also similar to the scheduled import of virtual machines and virtualization hosts. In the same manned, replace the data source to vScope-Host-VM-Rel.
The scheduled time for import should not be the same as for VM and Host imports. This is because the import of relationships depends on the hosts and virtual machines being present in the CI tables when the relationships are being created.
Therefore, schedule the import of relationships (any kind of relationships) to a time which is guaranteed to happen after the endpoints for the relationship have been imported.
So, if you import your virtual machines and hosts at 03:30, do the import of relationships 03:31 or later.