Configuring Single Sign-On (SSO) to use Azure as an identity provider (IDP) to vScope allows you to use enhanced security features, eg. MFA (Multi-factor authentication). Azure can be used to handle authentication and/or permission settings for users in vScope. This helps you to centralize ACL and user management to Azure. This guide shows you how to configure SSO in Azure. For additional settings you can find more information in related articles:
Before you start…
- To follow this guide, you need sufficient permission in Azure to mange App Registrations.
- Since vScope is installed in your data center, your vScope is required to have remote access to Azure.
- Make sure you have uploaded and saved an HTTPS certificate in vScope.
- Currently, only SSO using Single tenant is supported
1. Creating an App Registration
The first step is to register an app and configure the proper permissions to read users (and groups) from Azure.
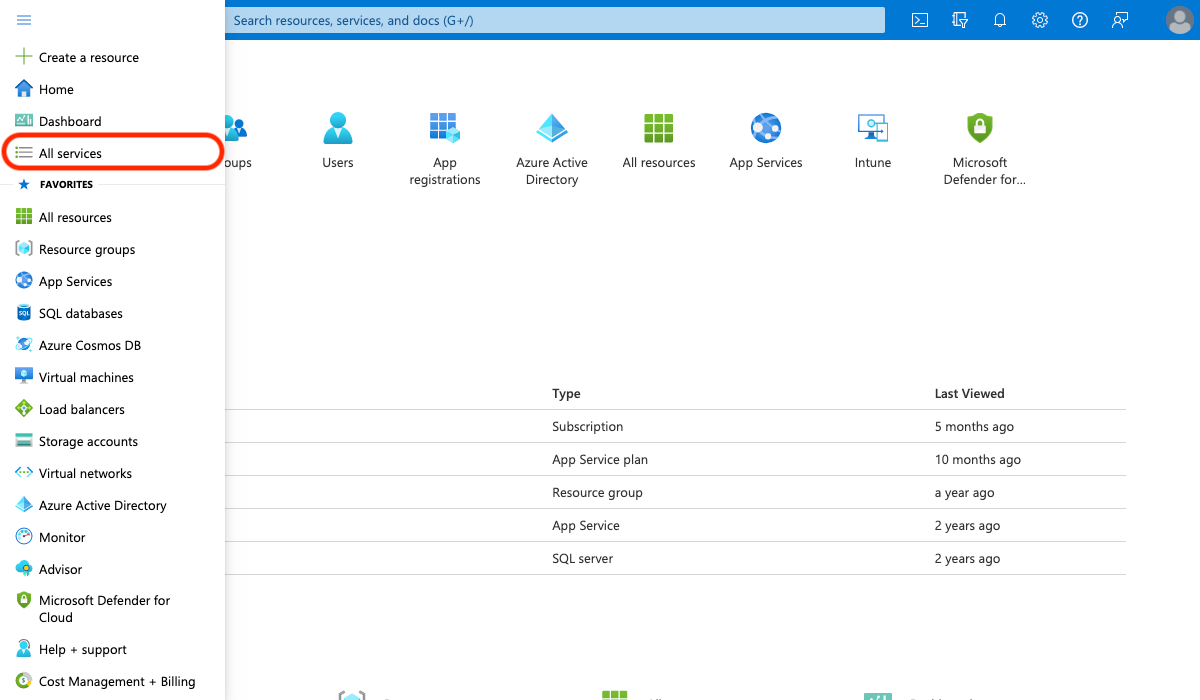
- Login to Azure Resource Manager https://portal.azure.com/
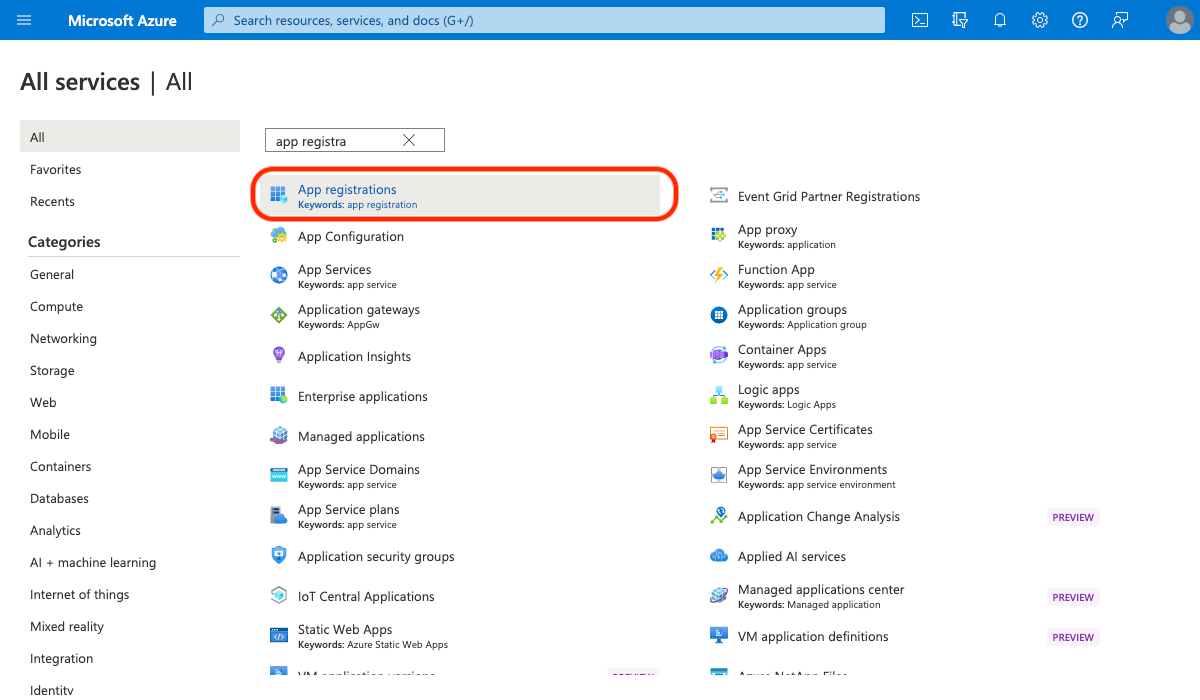
- Locate All services in the sidebar, search for, and click: App registrations
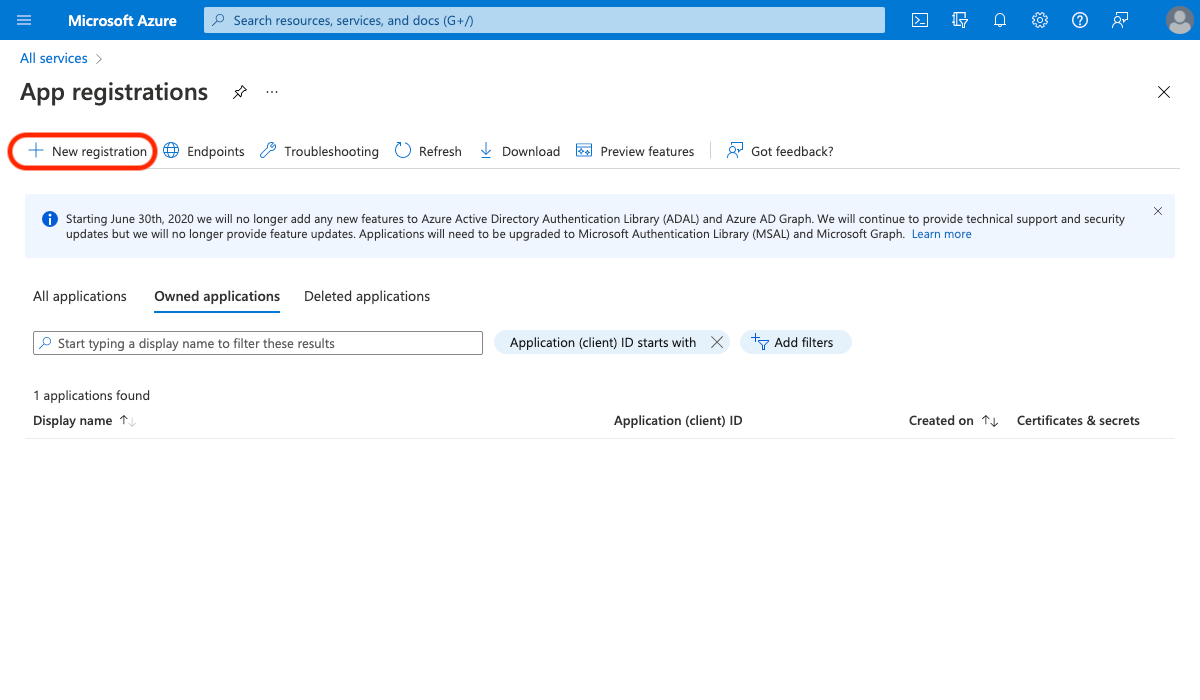
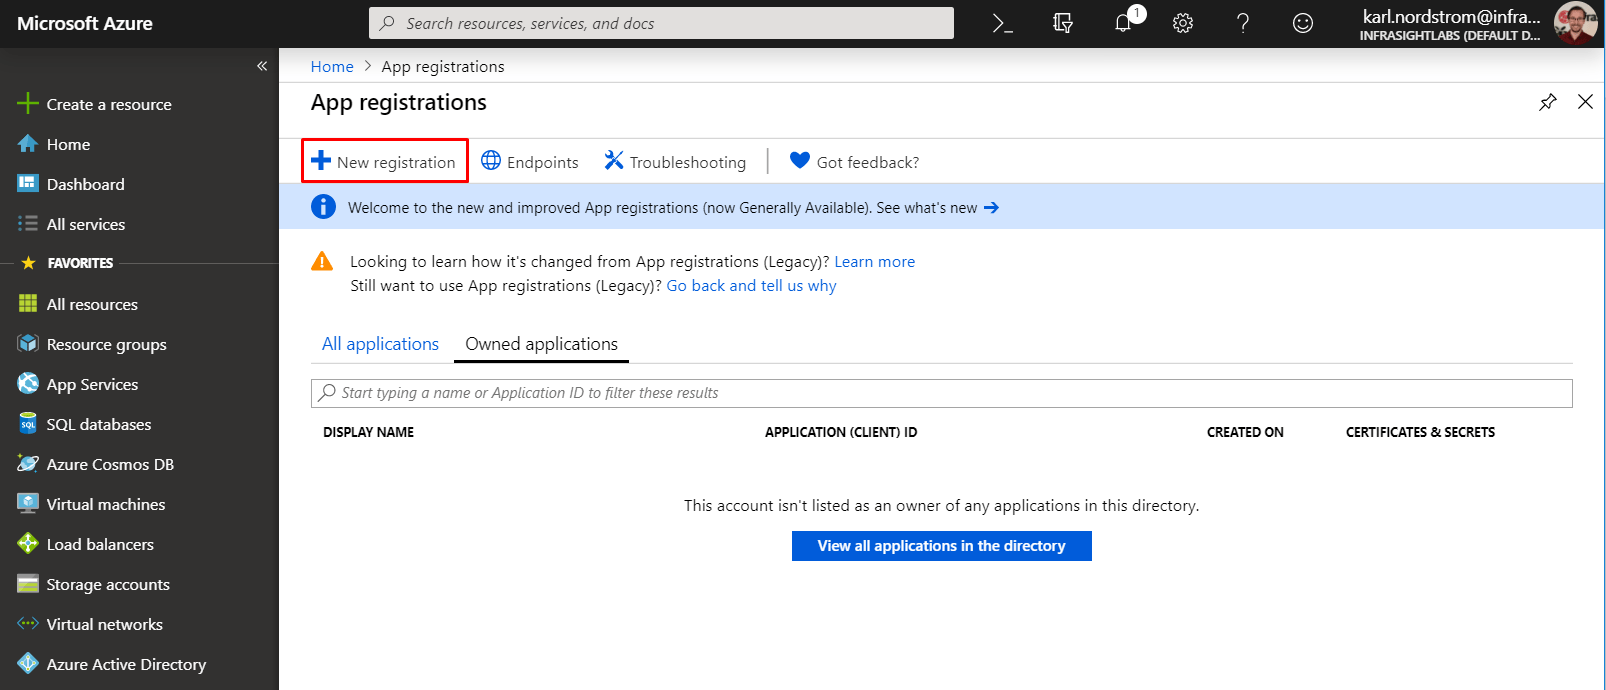
- Click + New registration to create a new App Registration
- Enter a Name: eg. vScope SSO
- Choose supported account types: Accounts in this organizational directory only (Default Directory only – Single tenant)
- Leave Redirect UI (optional) empty and click Register

Notice the Application (client) ID and Directory (tenant) ID. This will later be used to connect vScope to Azure.
2. Create an API key (secret) for the App registration
This API key will be used by vScope to securely connect with Azure.
- In the app registration: Click Certificates & secrets
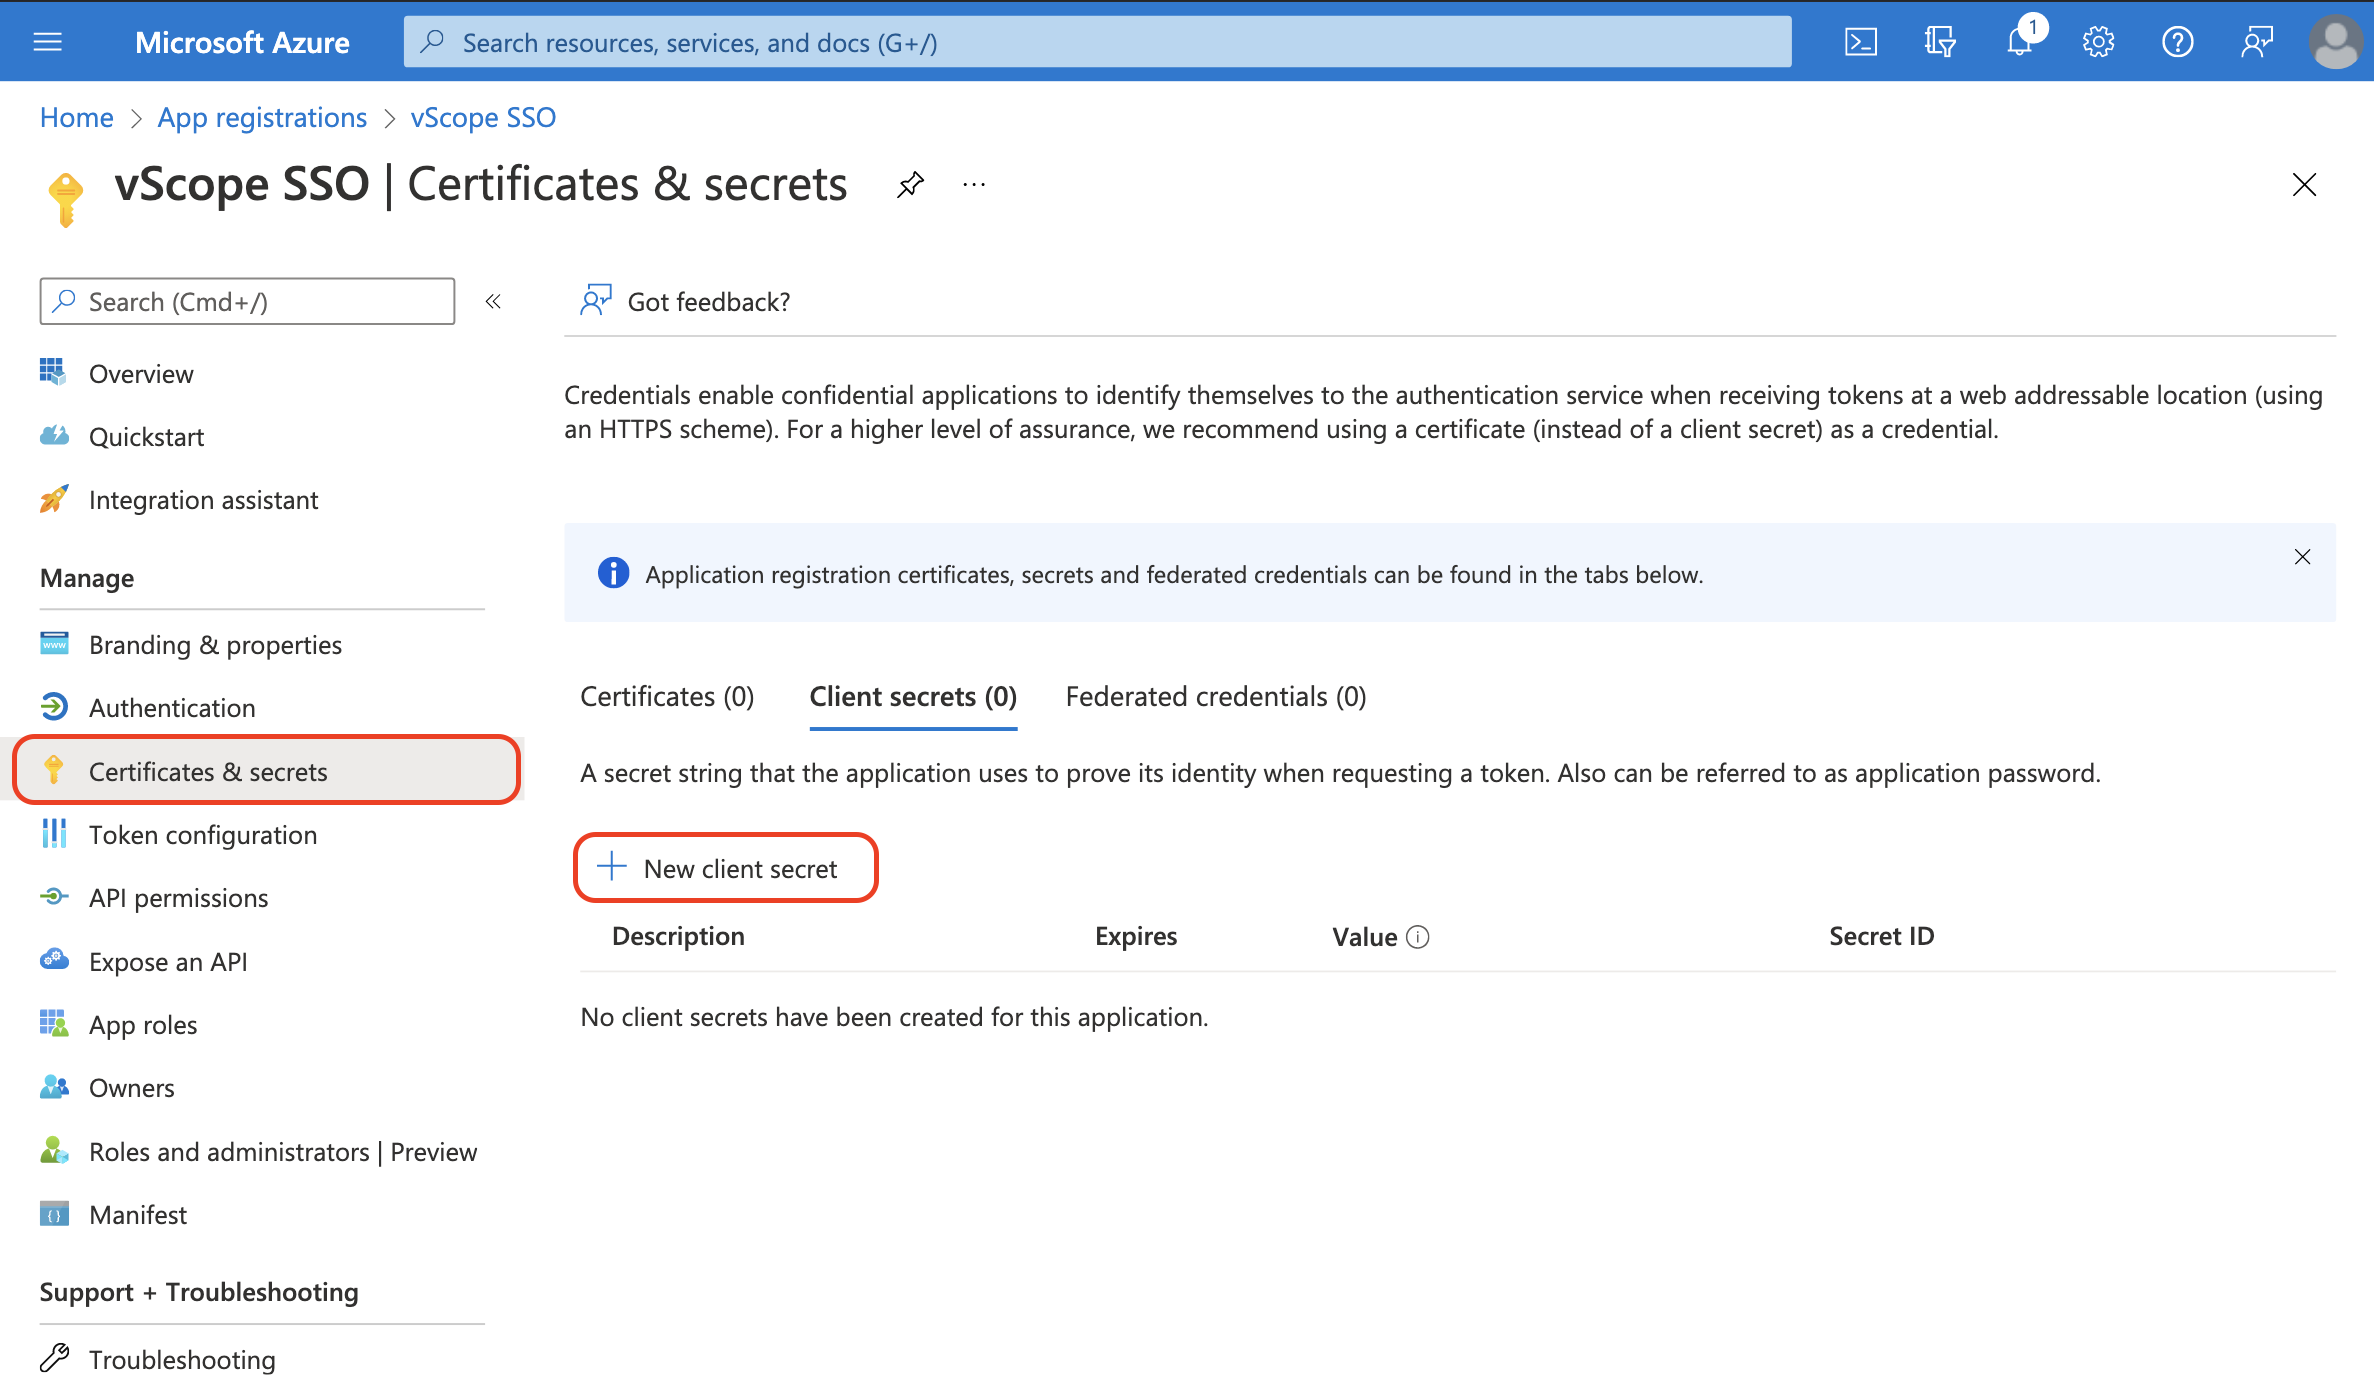
- Click + New client secret
- Enter a description: eg. Used for vScope SSO
- Choose expiry settings for this API key. Once the API Key is expired, you will need to redo this process.
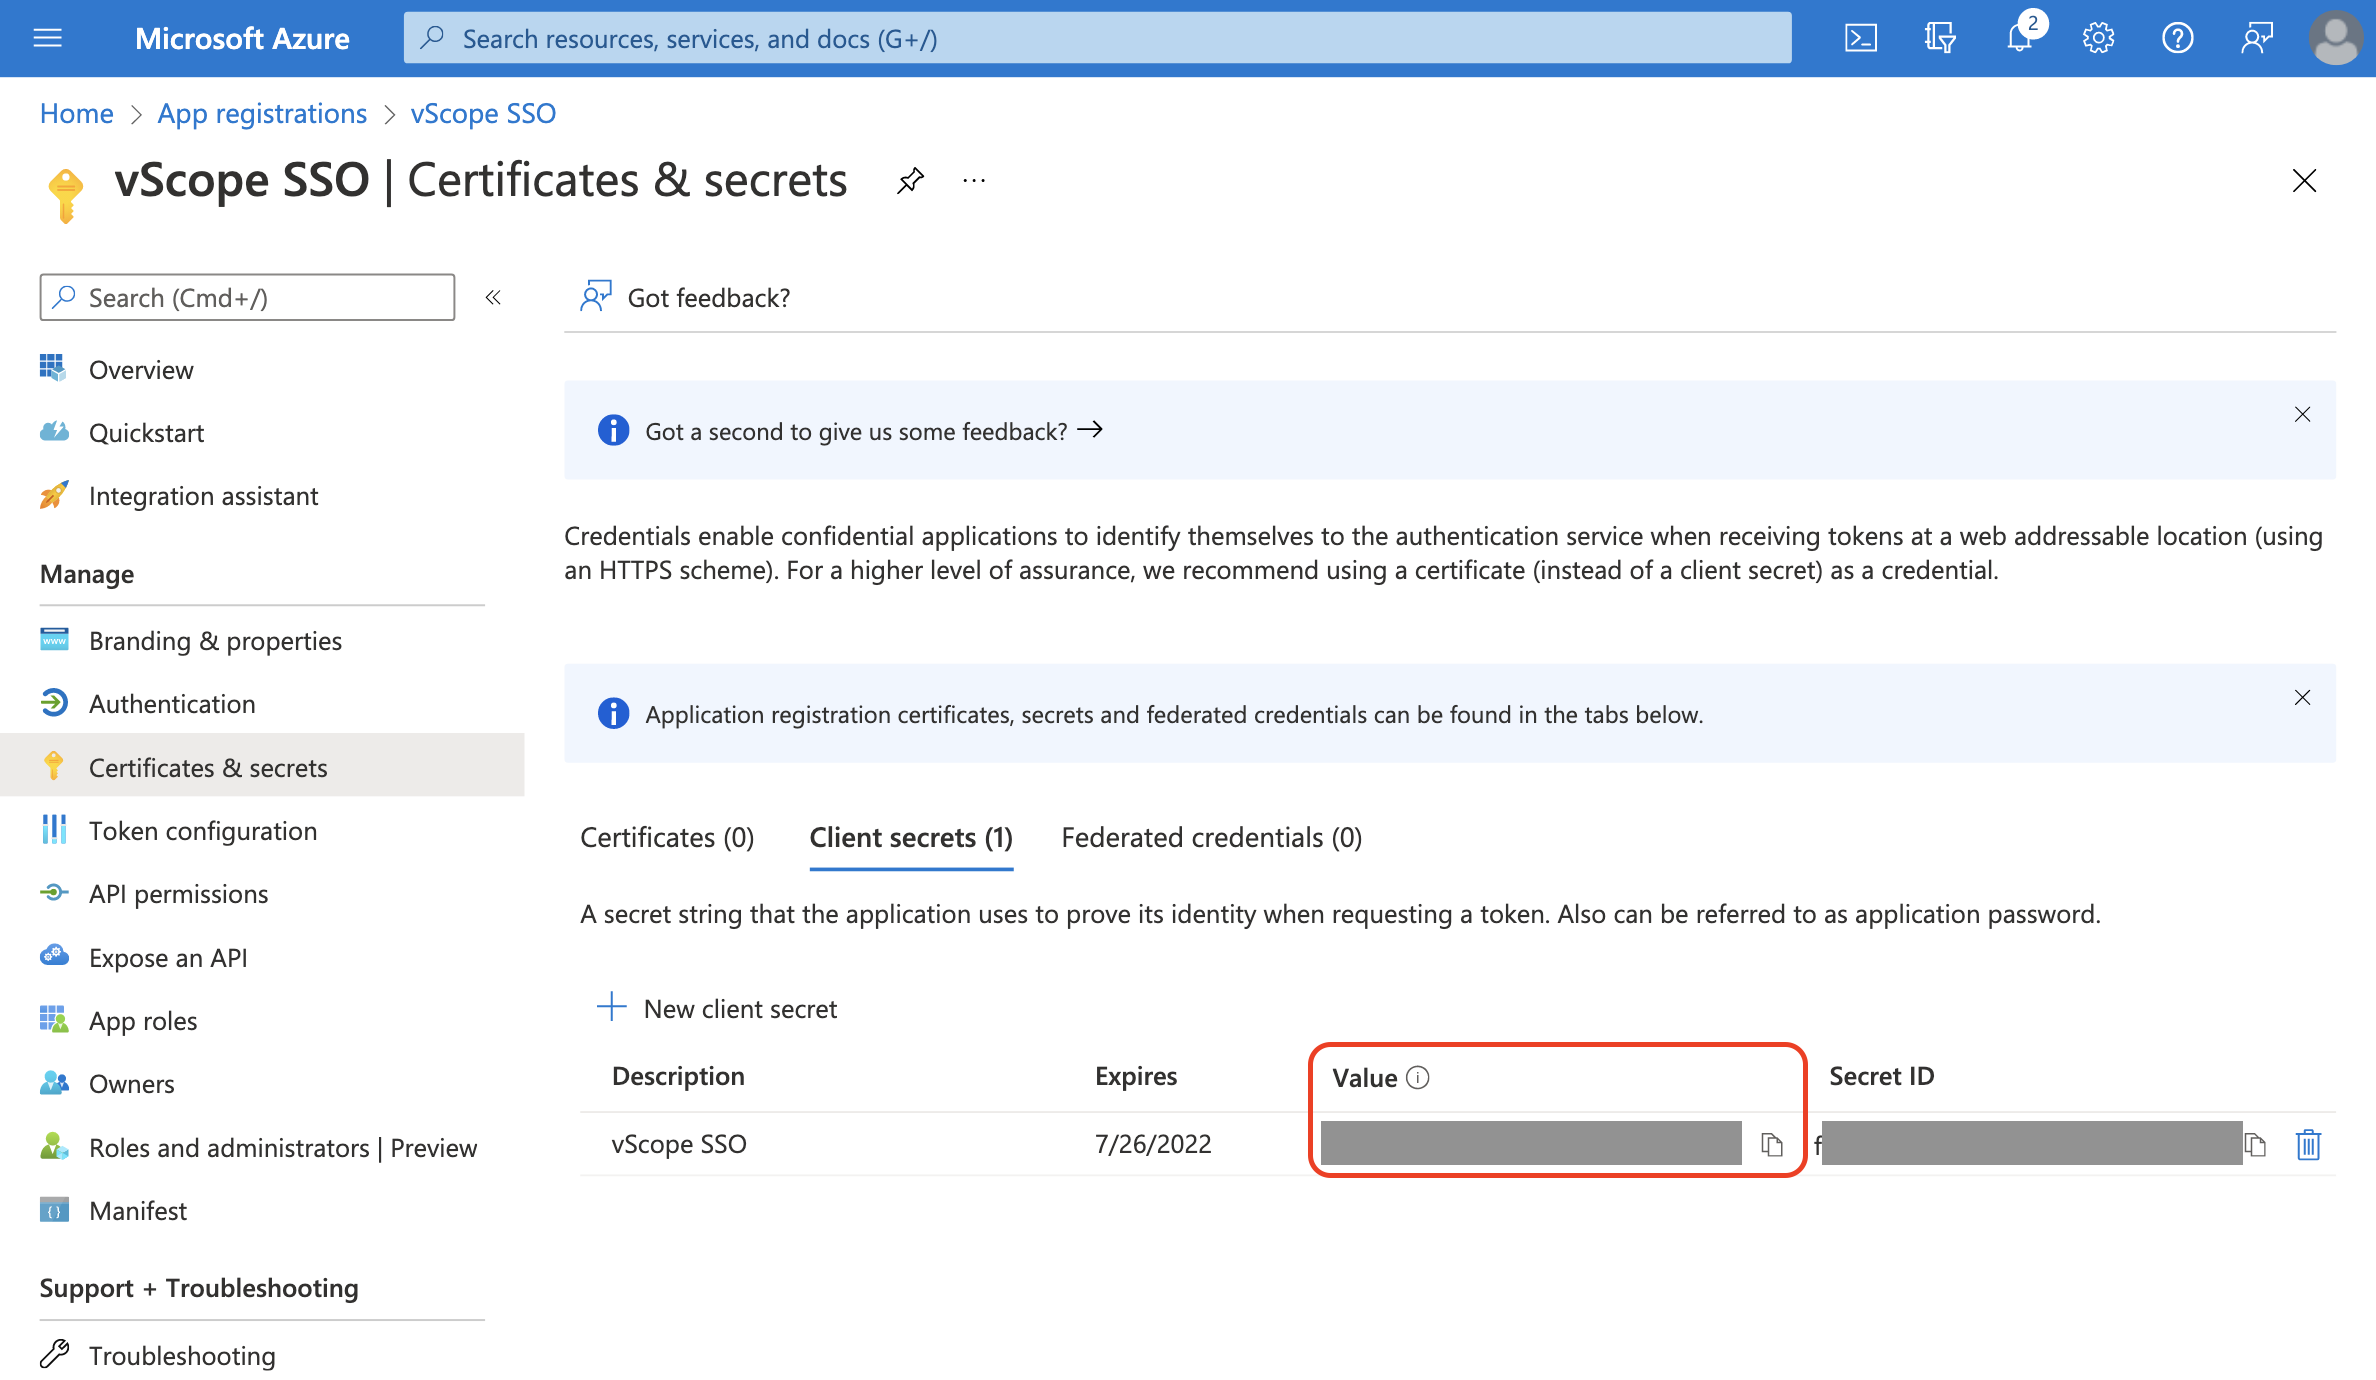
Important Notice Immediately copy and save “Value” from this view. Client secret values cannot be viewed, except for immediately after creation. So be sure to save the secret when created before leaving the page.
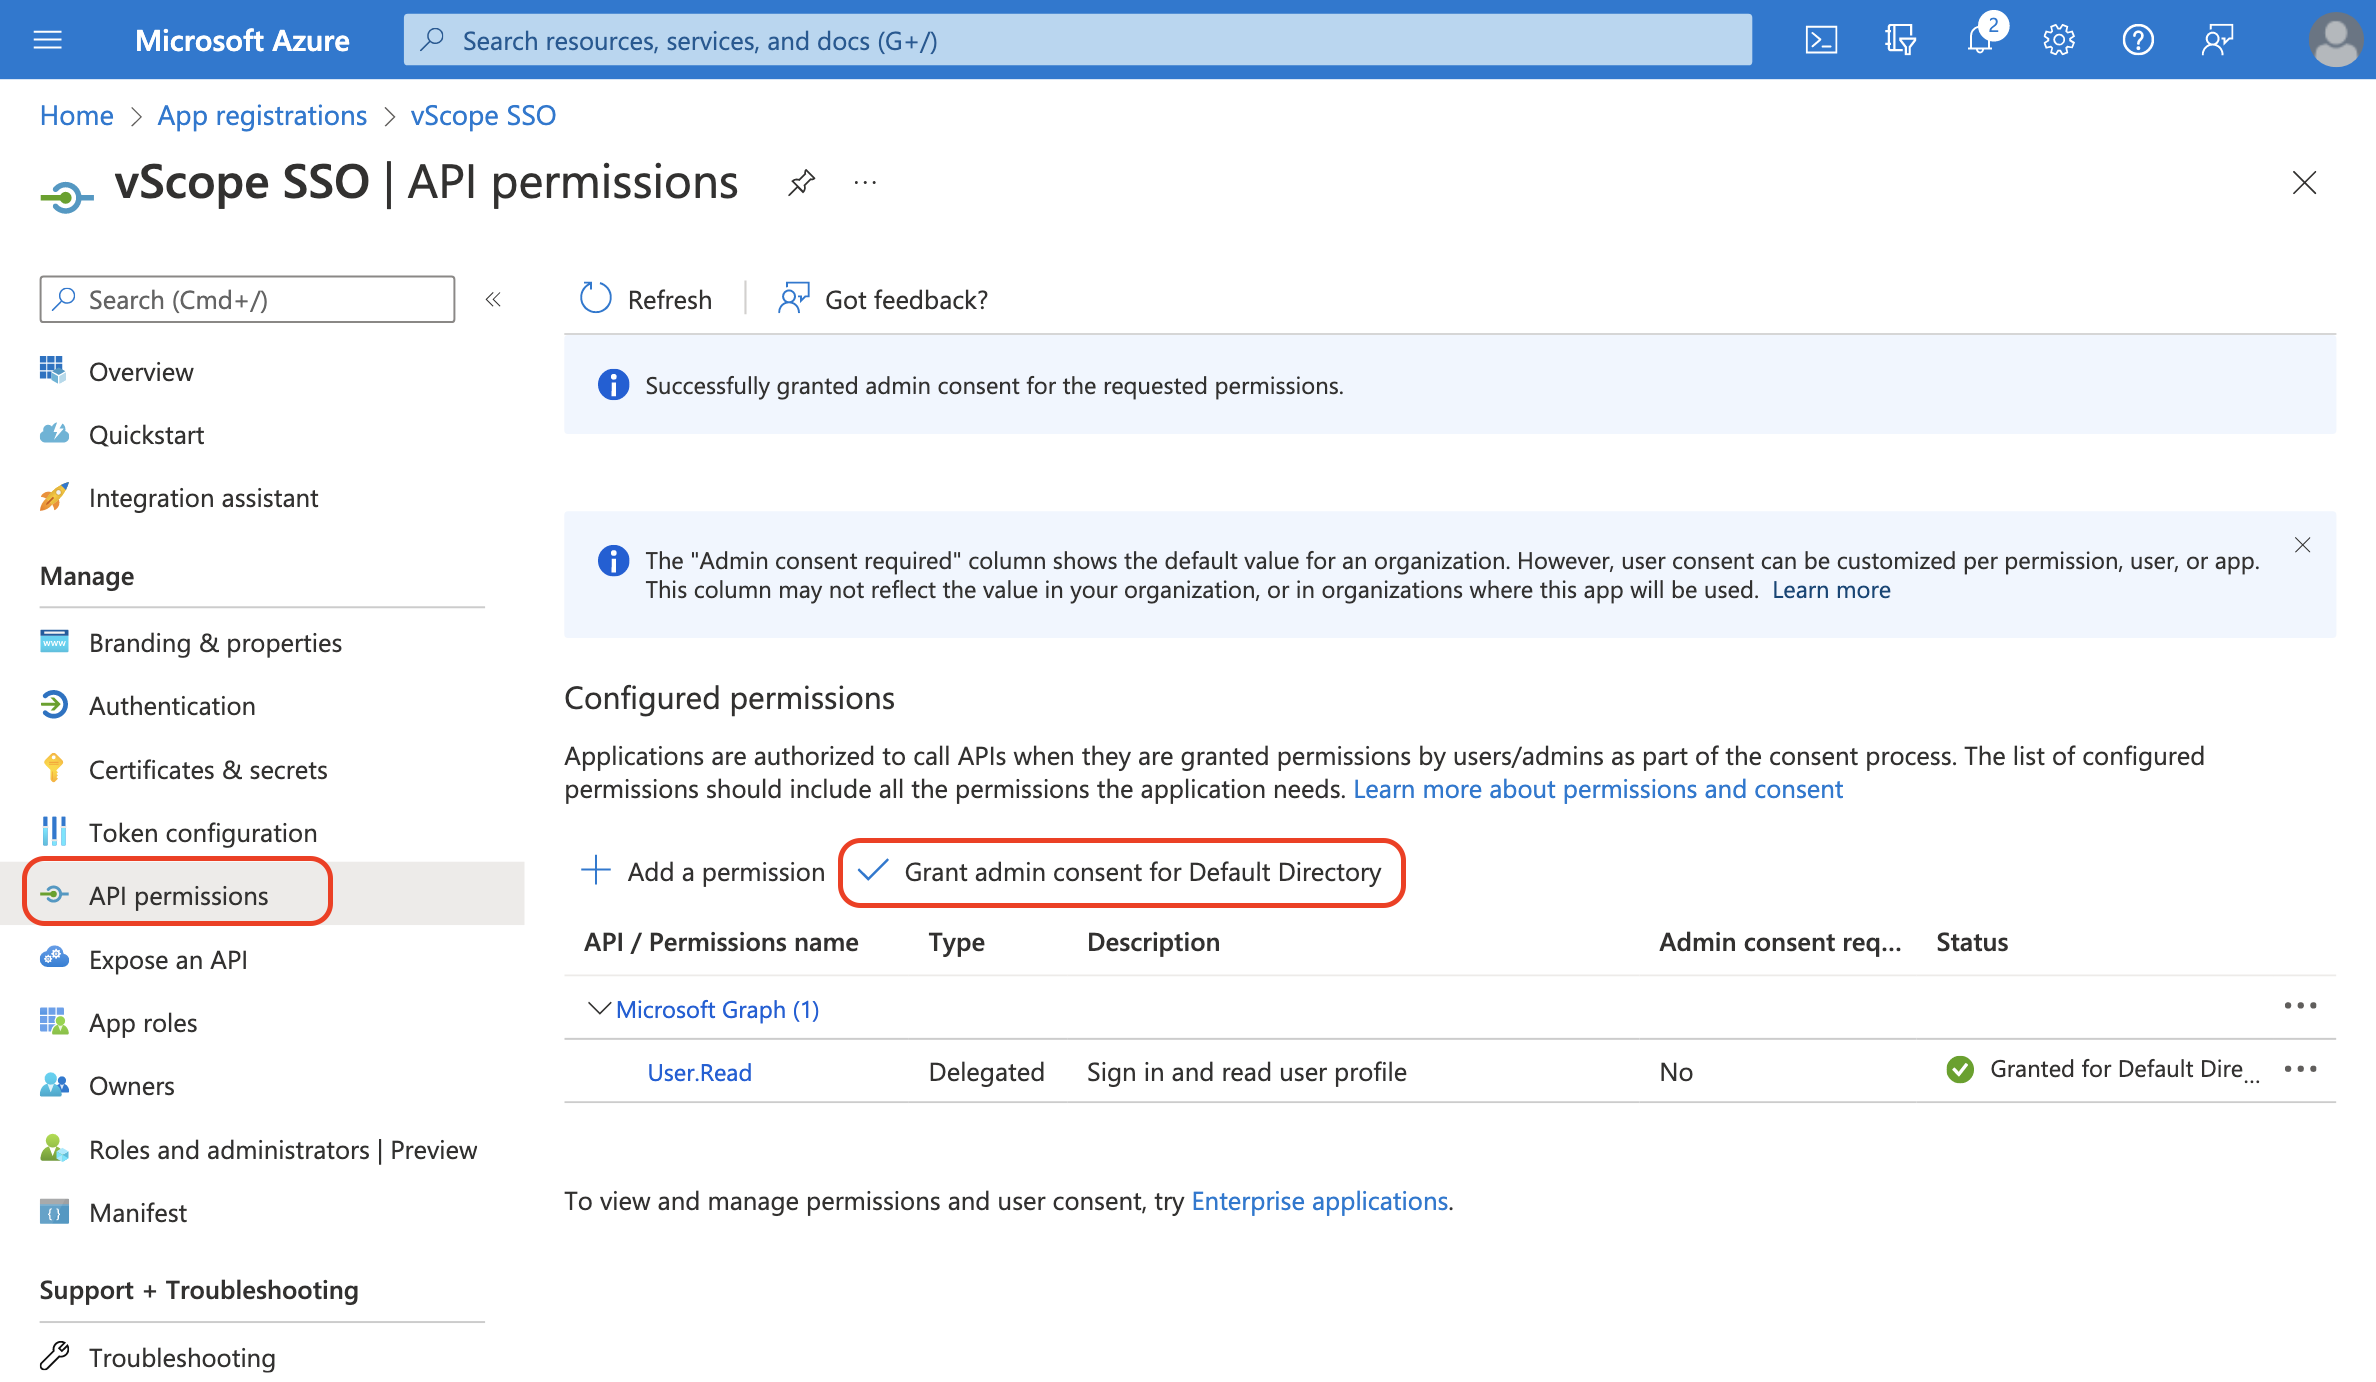
3. Grant sufficient permissions to the App Registration
Now we need to grant the app registration permission to read data from Azure.
- In your app registration, go to API permissions
- Click Grant admin consent for Default Directory
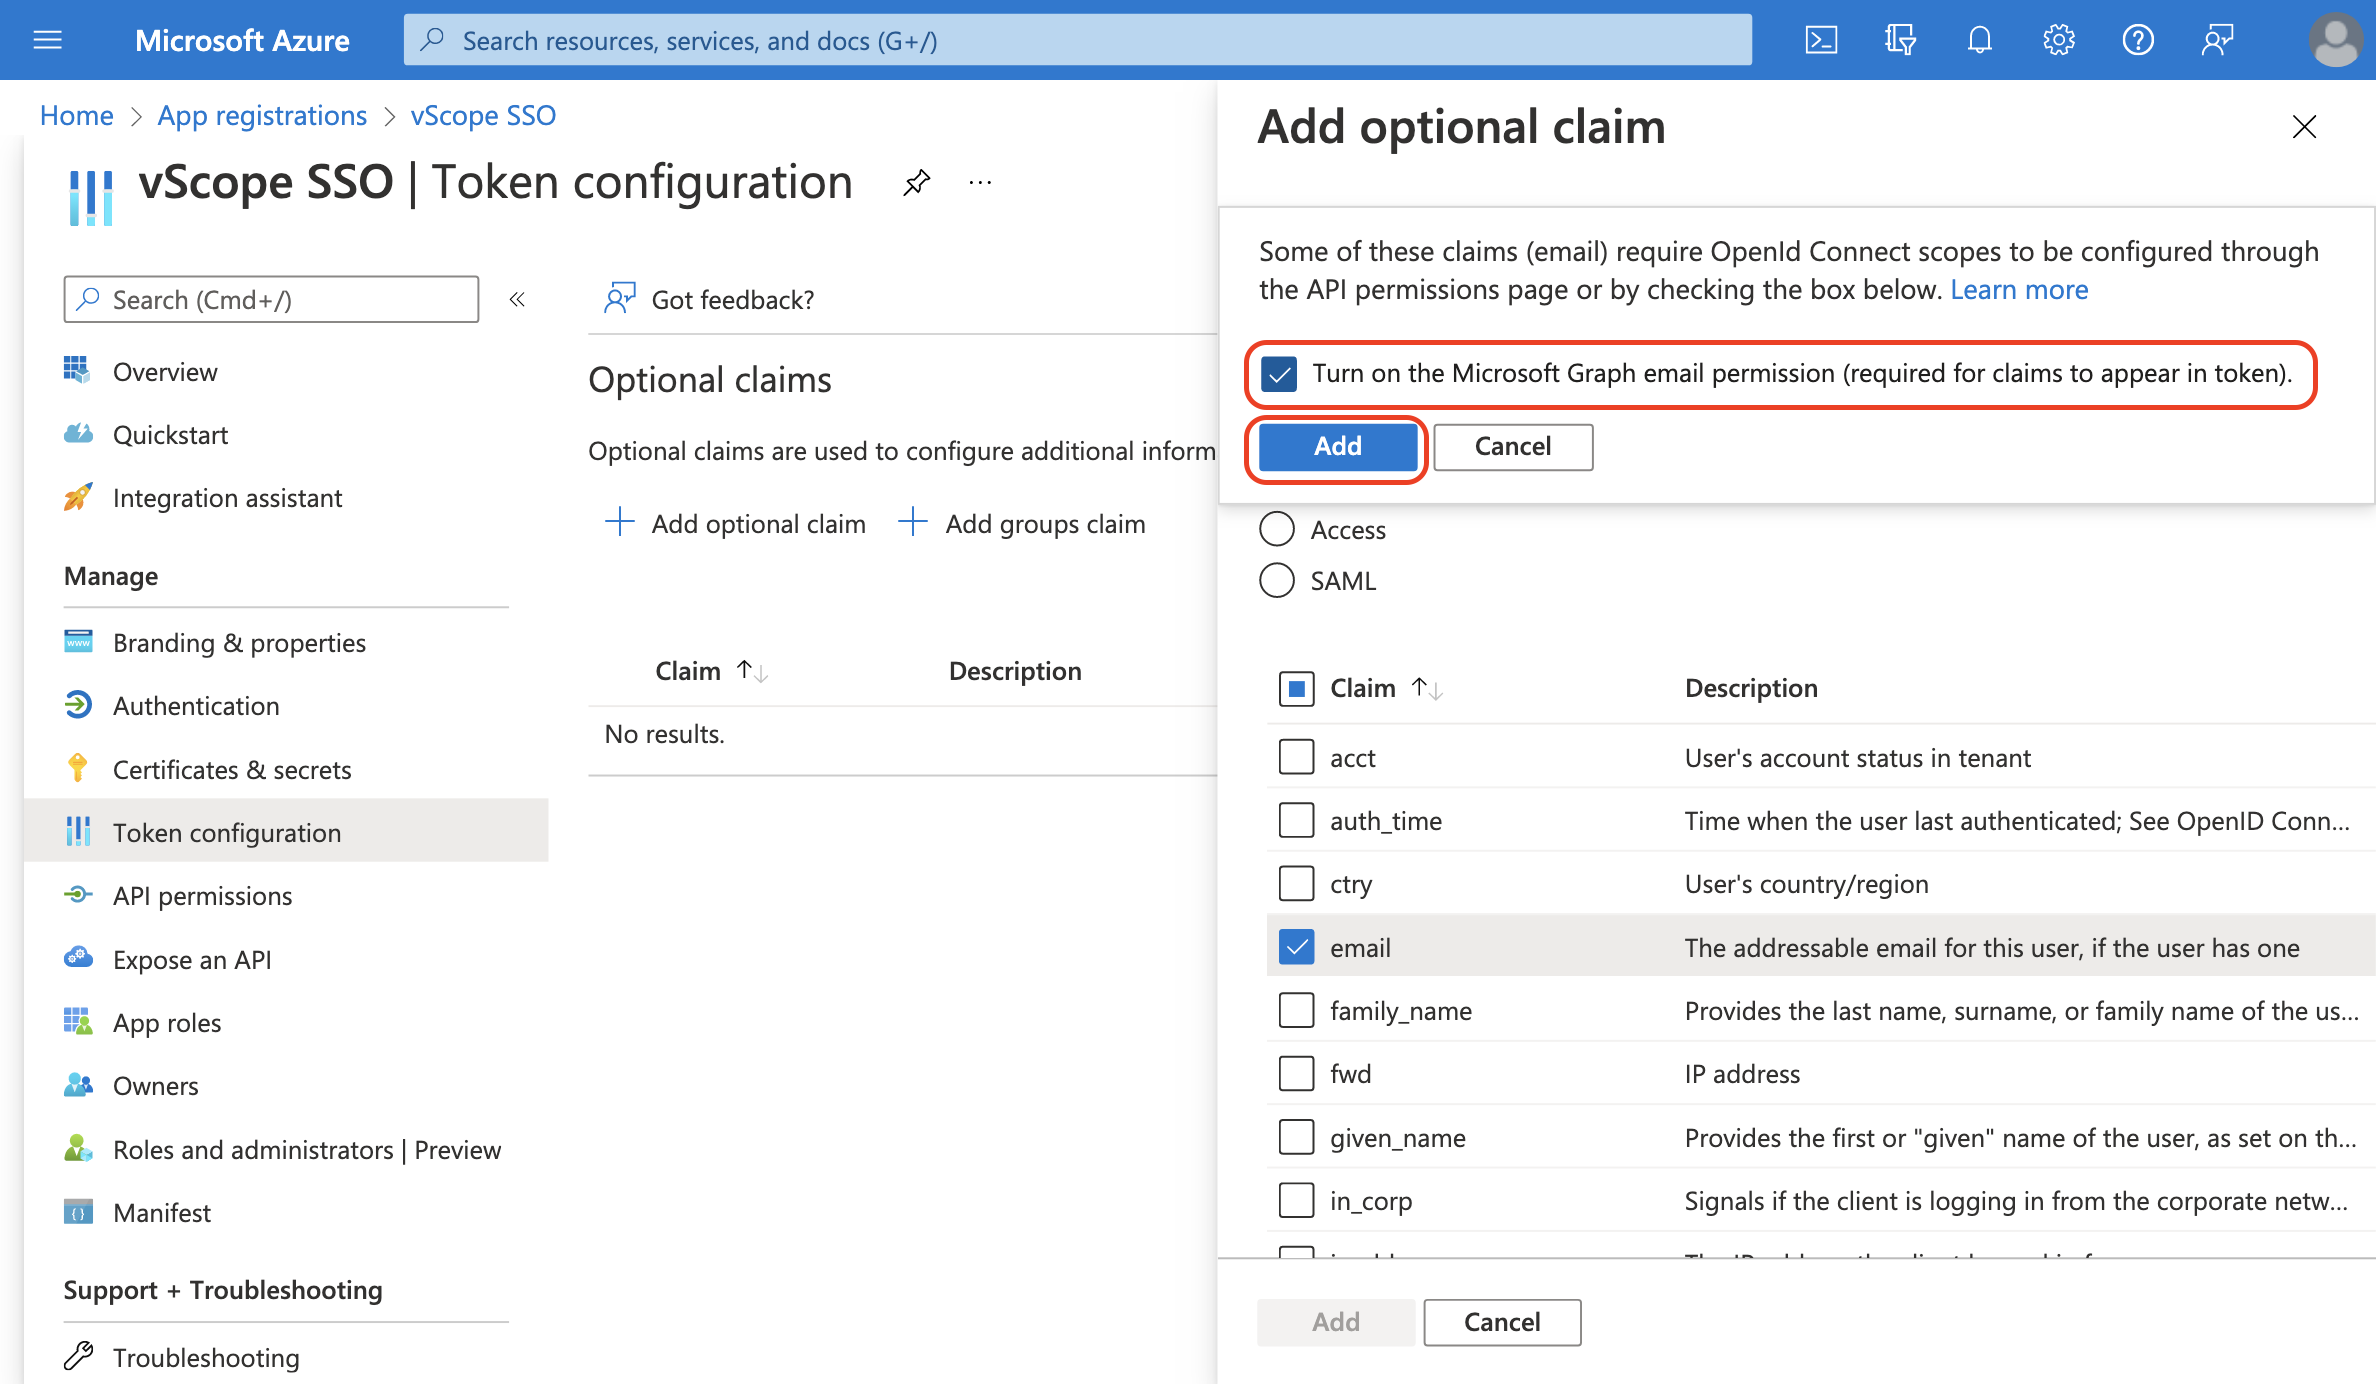
vScope will use the ’email’ property from Azure as an identifier for the user account. Therefore, we need to grant permission for the app registration to read email from Microsoft Graph API.
- In your app registration, go to Token Configuration > Add Optional Claim
- Select token type: ID
- Select Claim: email
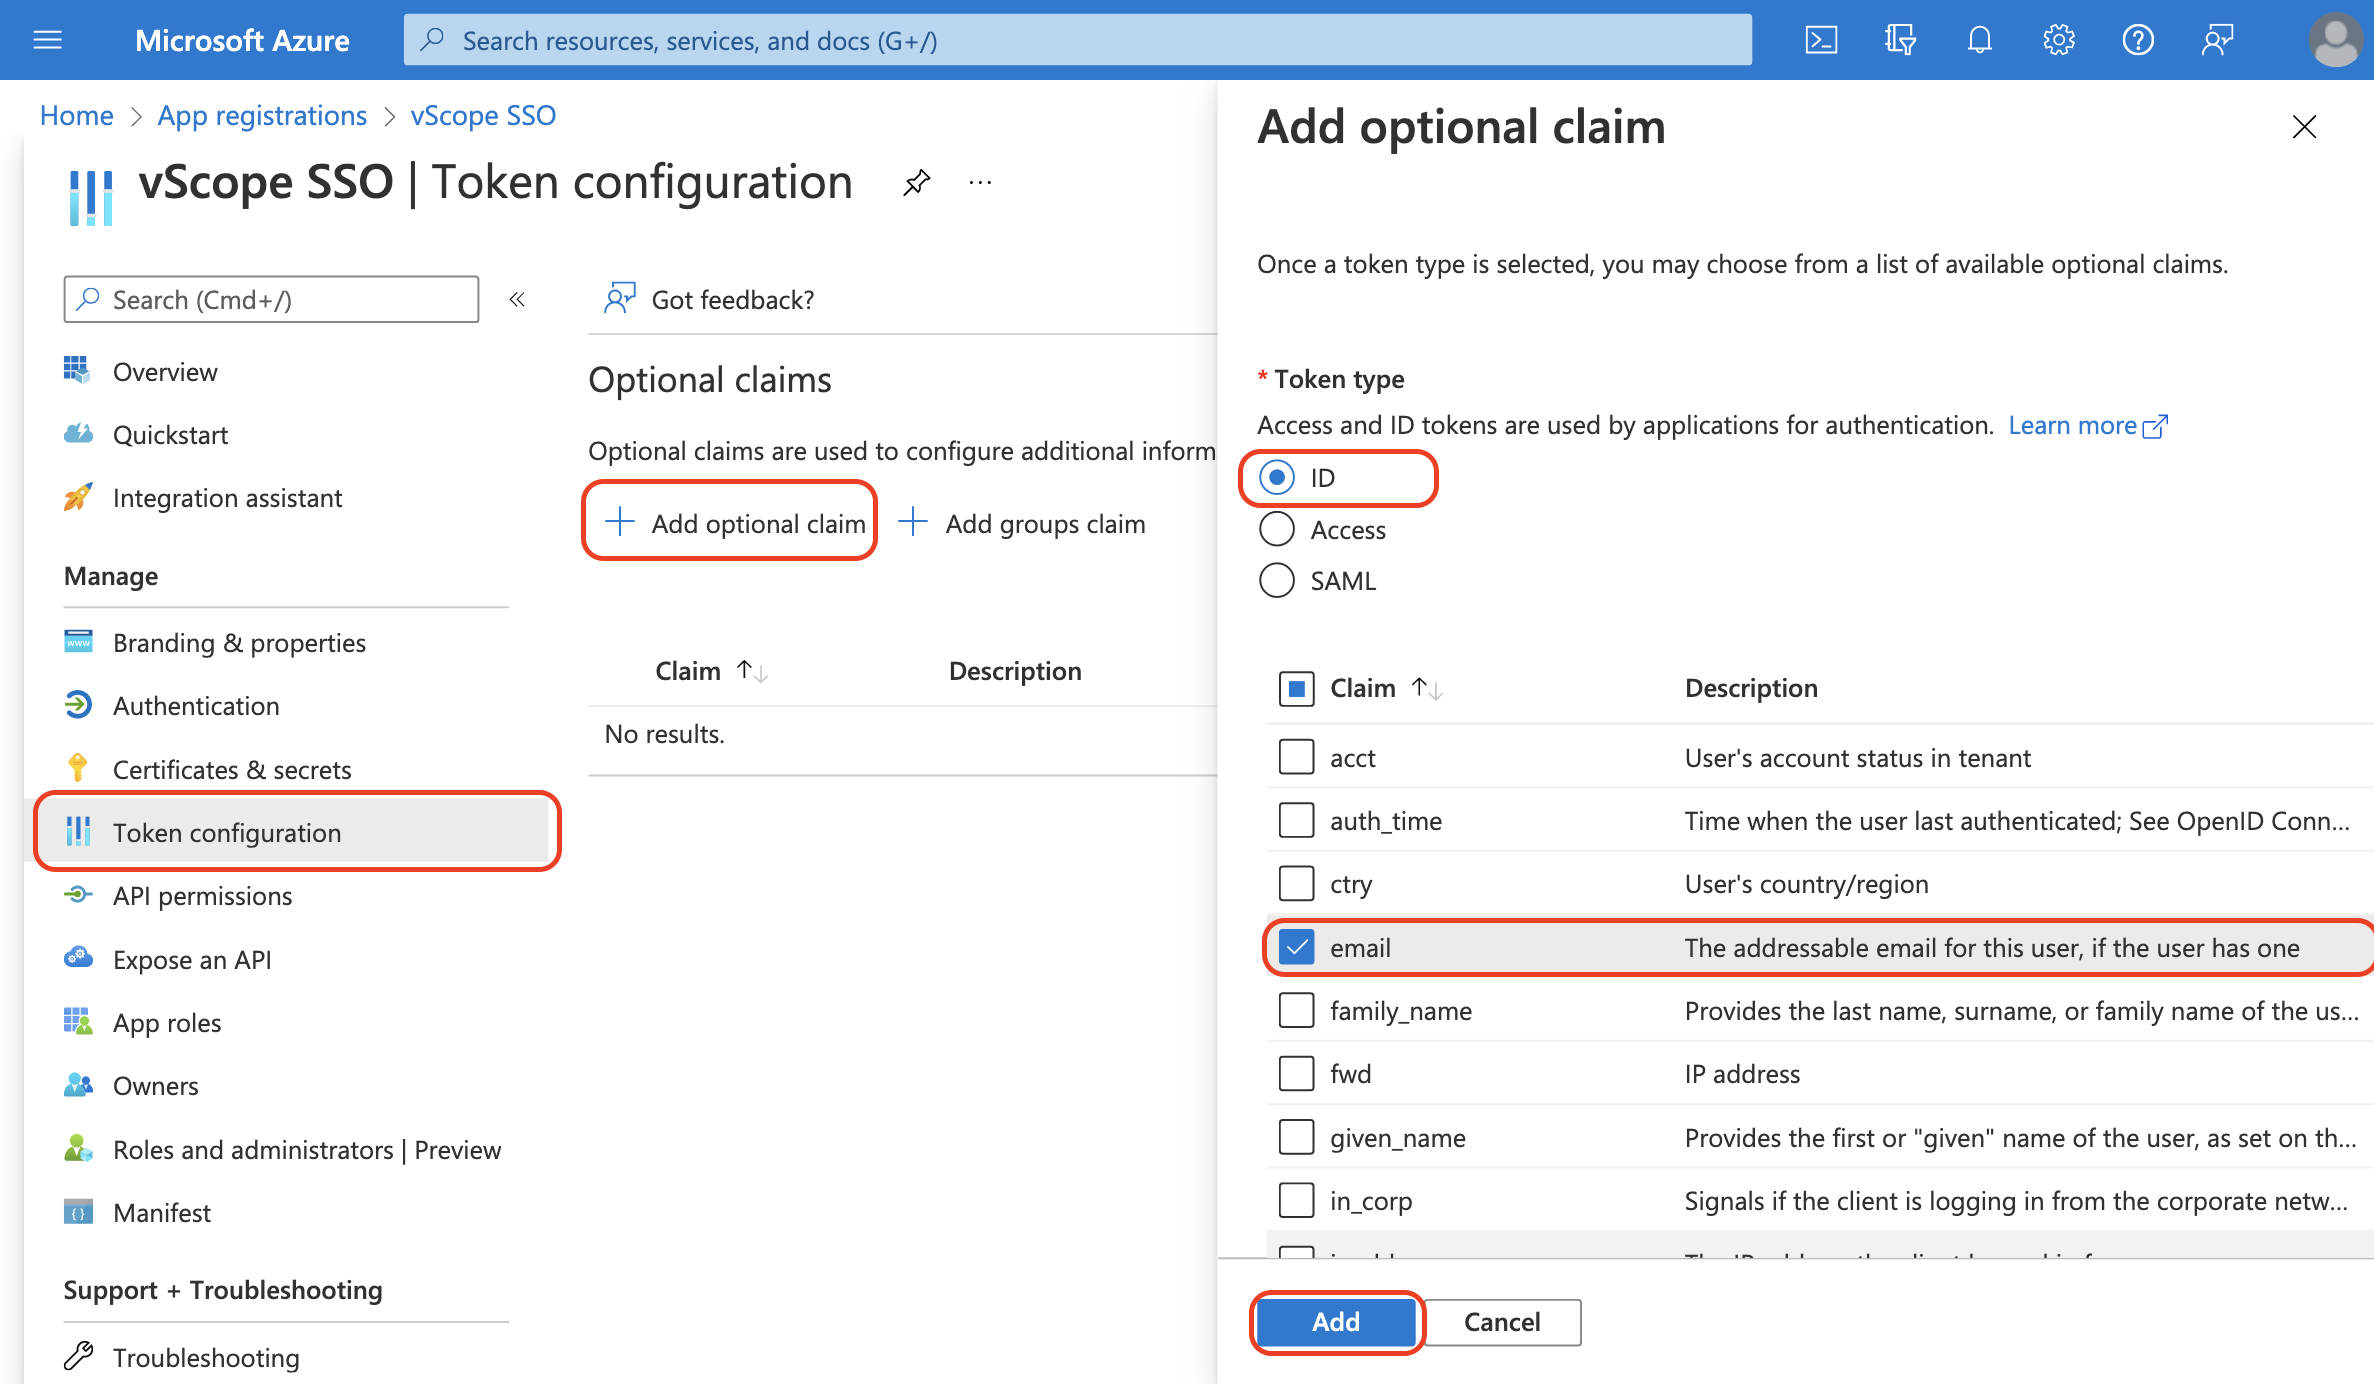
- When you have clicked “Add”, a float will appear
- Check Turn on the Microsoft Graph email permission (required claims to appear in token)
- Click Add
4. Configure SSO in vScope
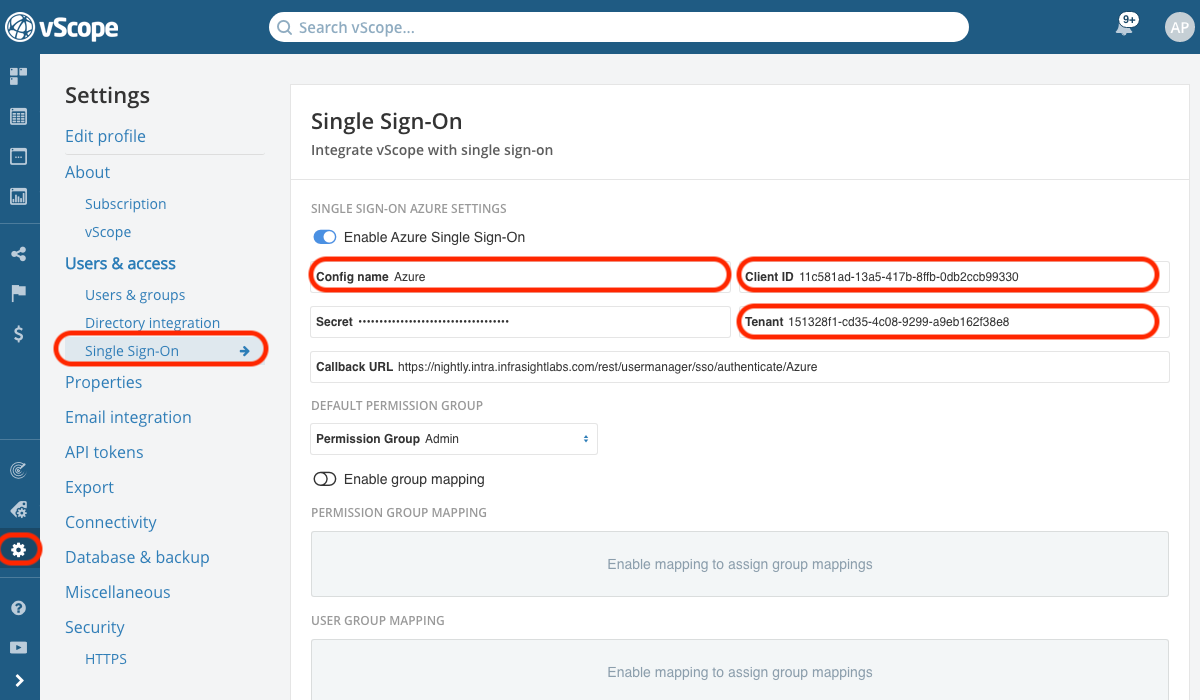
In this step, you will enter all necessary values from Azure into vScope to configure SSO. You will need admin permissions for this step.
- Go to Settings > Users & Access > Single Sign-On, and enable Azure Single Sign-On
- Enter a Configuration Name, eg. AzureSSO (This is used in the callback URL and must contain A-z letters and/or 0-9 digits)
- Paste ClientID (from Application (client) ID in Step 1 underApp Registration Overview)
- Paste TenantID (from Directory (tentant) ID in Step 1 under App Registration Overview)
- Paste Secret (from Value in Step 2 under Certificates & Secrets > Client secrets)
- Click Save to get a Callback URL used in Step 5
5. Configure Authentication for App Registration in Azure
In this final step, you will configure authentication for your app registration.
- In your app registration, go to Authentication

- Add a new plattform configuration by clicking + Add a platform
- Select Web as platform
- Copy and past Callback URL from vScope (Step 4) into Redirect URIs.
- Skip Front-channel logout URL, instead select ID tokens (used for implicit and hybrid flows)
and click Configure
—
If you have reached this step, you have successfully configured Azure SSO in vScope. You can now use Azure as an authentication method when signing into vScope.
Step 6 in this article is an optional step and only relevant if you want to manage permissions from Azure.
6. Use Azure for group and permission mapping i vScope (optional)
In this step, you will configure vScope to be able to use group settings from Azure for group and permission mapping.
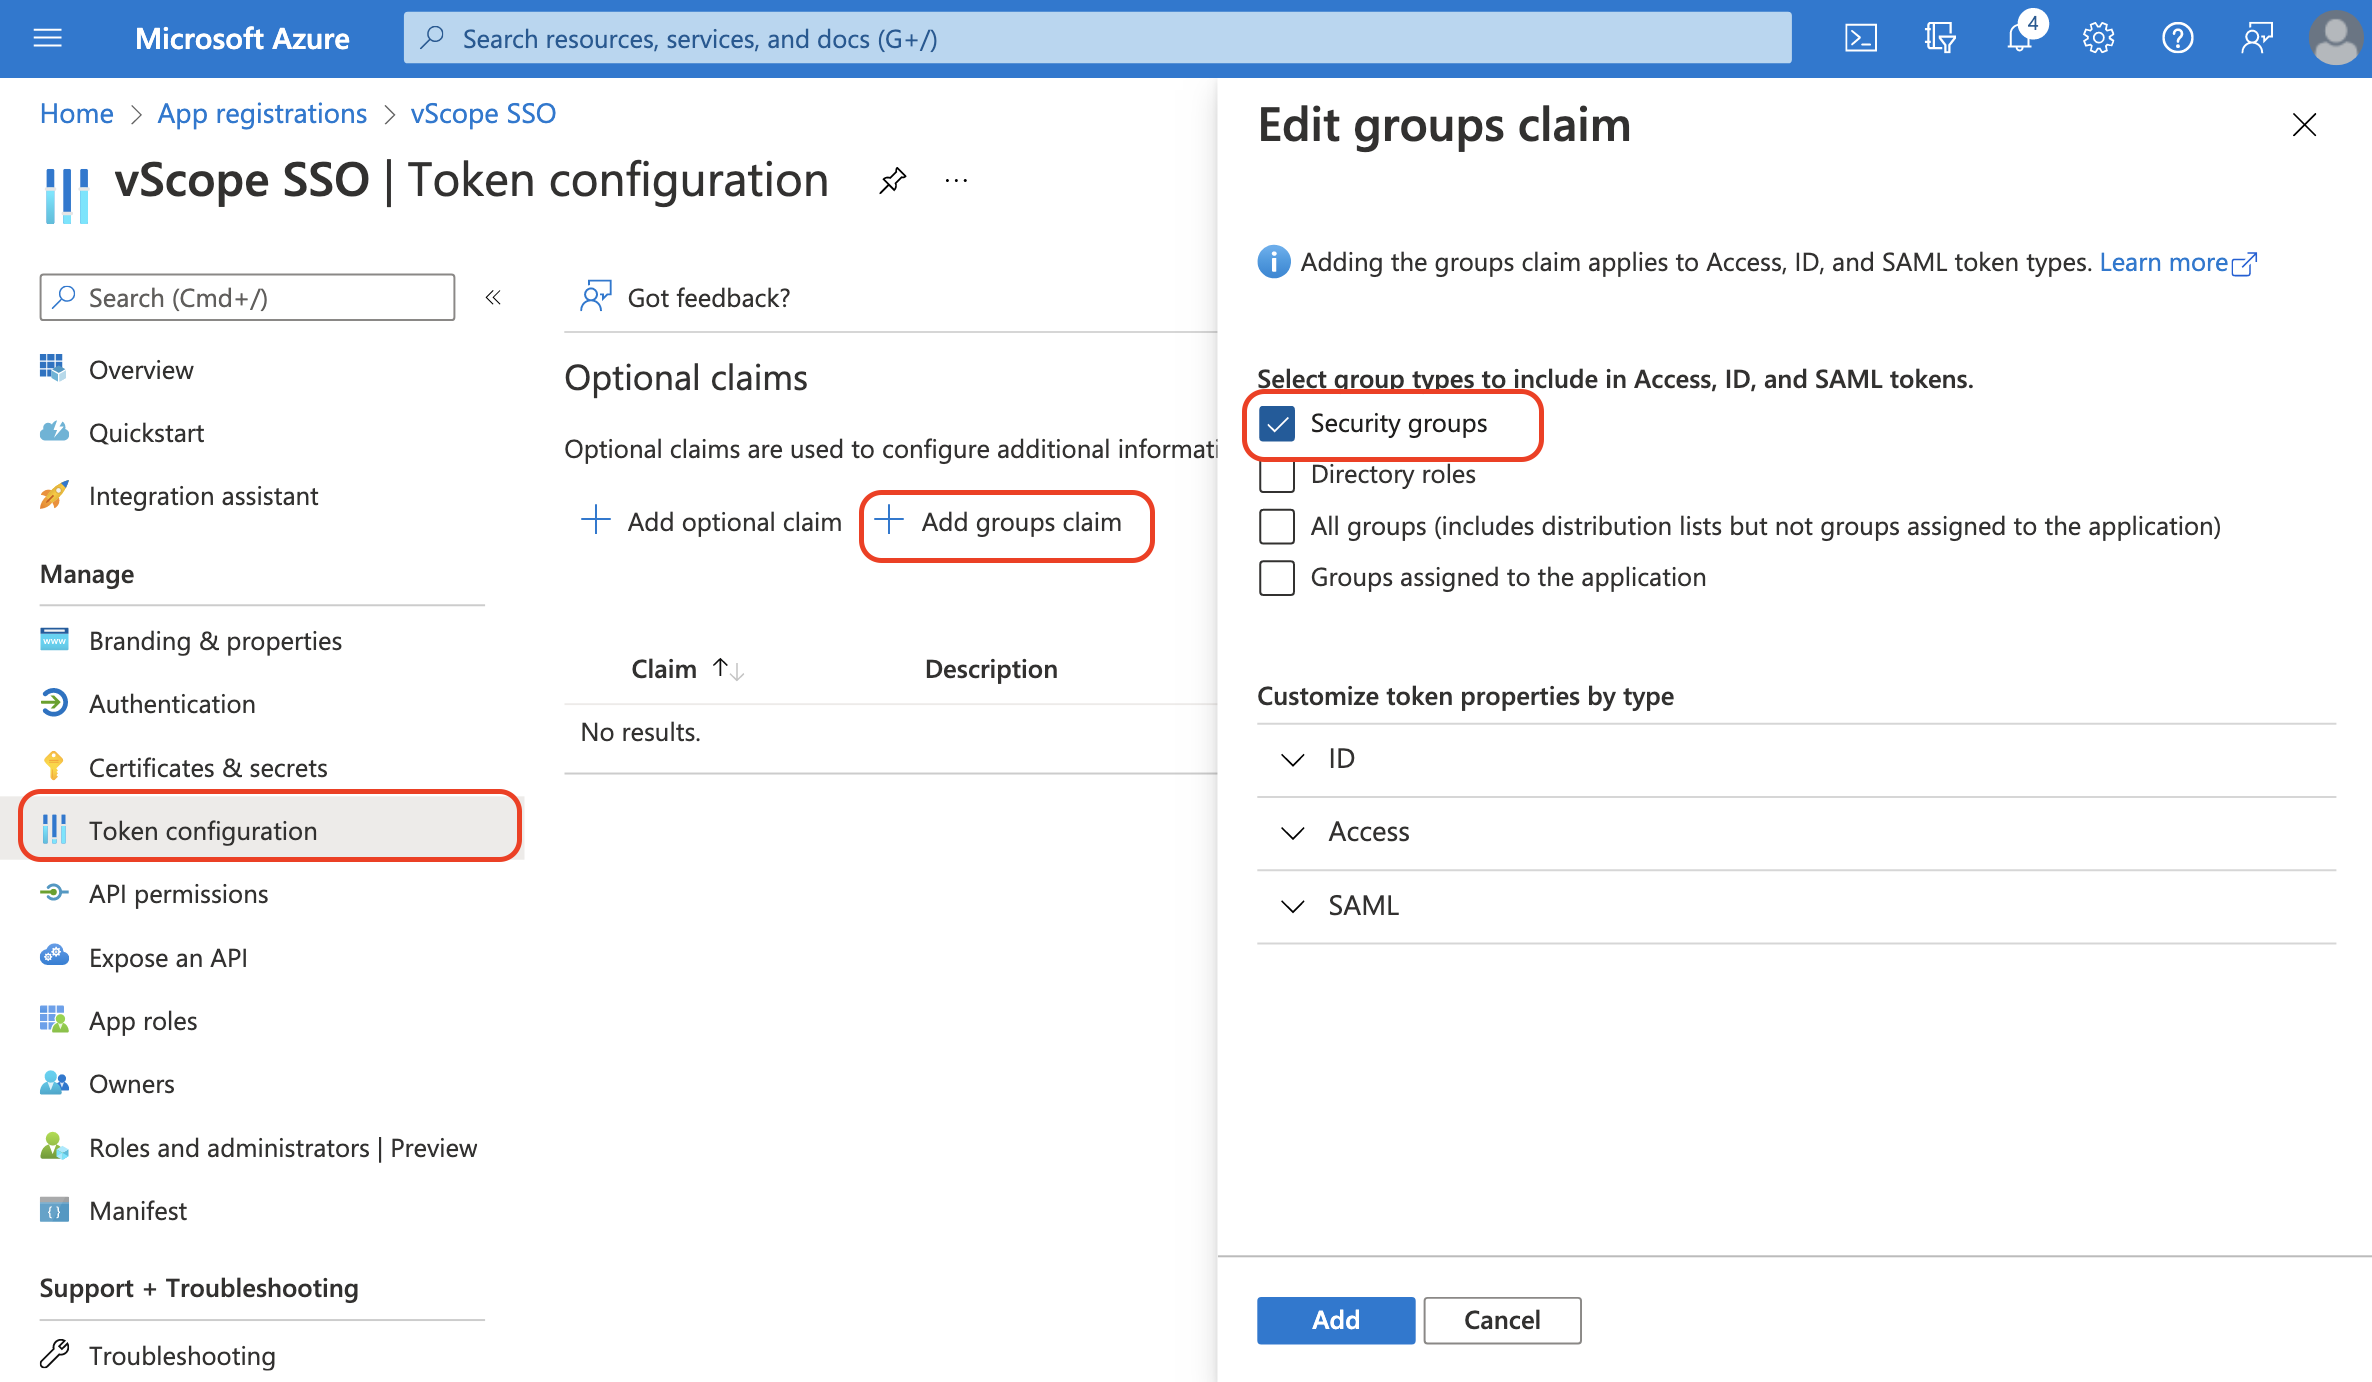
- In you app registration in Azure, go to Token configuration
- Click + Add groups claim
- Select the proper settings that you want to use for group and permission mapping in vScope (eg. add user to a group based on Directory role). Learn more about groups claim at docs.microsoft.com.
- Click add to add groups claim
Now you can use groups claims for groups and permission mapping in vScope. Learn more about how to add these mappings in this article.
If an URL resolves to the vScope installation
If you access vScope using an URL that resolves to your vScope installation, make sure you have changed Base URL in Settings->Miscellaneous and update your callback URL in Azure accordingly. Otherwise you might experience an error message upon logging in, as the callback URL from Azure doesn’t match with the URL that directs you to vScope.