This is a guide on how to enable and test WMI access with a regular domain user without generic admin rights.
Make sure you have followed the steps in the KB Setting up WMI-access through AD & GPO. This ensures that you have configured DCOM access, WMI namespace permissions and firewall exceptions correctly.
Let’s define two machines:
Client – The machine you are scanning from (for example, your machine running vScope)
Target – The machine you are attempting to scan
Test access to basic system information in WMI
Open up a PowerShell prompt on the Client. We will now test if we can get hold of the ComputerSystem object from the Target system through WMI. Run the following on the Client system:
Get-WmiObject -Class Win32_ComputerSystem -ComputerName Target -Credential isl\wmiuserIf successful, the output should be details about the Target system:
Domain : isl.local
Manufacturer : VMware, Inc.
Model : VMware Virtual Platform
Name : Target
PrimaryOwnerName : Windows User
TotalPhysicalMemory : 8589463552
If an error occurs it might look like below. The first error (E_ACCESSDENIED) is most likely due to insufficient DCOM rights. See step 2 in Setting up WMI-access through AD & GPO.
Get-WmiObject : Access is denied. (Exception from HRESULT: 0x80070005 (E_ACCESSDENIED))
At line:1 char:1
+ Get-WmiObject -Class Win32_ComputerSystem -ComputerName Target - ...
+ ~~~~~~~~~~~~~~~~~~~~~~~~~~~~~~~~~~~~~~~~~~~~~~~~~~~~~~~~~~~~~~~~~~~~~
+ CategoryInfo : NotSpecified: (:) [Get-WmiObject], UnauthorizedAccessException
+ FullyQualifiedErrorId : System.UnauthorizedAccessException,Microsoft.PowerShell.Commands.GetWmiObjectCommand
The second error (GetWMIManagementException) is most likely due to insufficient rights on the WMI namespace. See step 3 in Setting up WMI-access through AD & GPO.
Get-WmiObject : Access denied
At line:1 char:1
+ Get-WmiObject -Class Win32_ComputerSystem -ComputerName Target - ...
+ ~~~~~~~~~~~~~~~~~~~~~~~~~~~~~~~~~~~~~~~~~~~~~~~~~~~~~~~~~~~~~~~~~~~~~
+ CategoryInfo : InvalidOperation: (:) [Get-WmiObject], ManagementException
+ FullyQualifiedErrorId : GetWMIManagementException,Microsoft.PowerShell.Commands.GetWmiObjectCommand
Test access to system patch information in WMI
Once you have managed to resolve all errors running the above command we will also verify that you have permissions to get installed Windows quick-fix engineering (QFE) updates. These are system wide updates for the operating system. These updates are not listed in the registry so it is vital that vScope has access to them in order to correctly display update information.
To try it out, run the following command in your PowerShell on the Client system:
Get-WmiObject -Class Win32_QuickFixEngineering -ComputerName Target -Credential isl\wmiuser
You should now get back a list of installed QFE. Example:
Source Description HotFixID InstalledBy InstalledOn
------ ----------- -------- ----------- -----------
Target Update KB3192137 NT AUTHORITY\SYSTEM 2016-09-12 00:00:00
Target Update KB3199986 NT AUTHORITY\SYSTEM 2017-01-19 00:00:00
Target Security Update KB3213986 NT AUTHORITY\SYSTEM 2017-01-19 00:00:00
If this list is empty, you either don’t have any updates installed or wmiuser lacks permissions to retrieve the information. To troubleshoot an empty list, attempt to run the same command as an domain administrator:
Get-WmiObject -Class Win32_QuickFixEngineering -ComputerName Target -Credential isl\administrator
If you now have a non-empty list then there is a permission problem. If the list is still empty then you most likely do not have any updates installed. Please verify that this is the case.
If the list differs when running as wmiuser compared to administrator we need fix some permissions on the Target system.
Troubleshoot missing system patch information
RDP (Remote Desktop) to the Target system as an administrator with sufficient rights (account set up depending on your local policy).
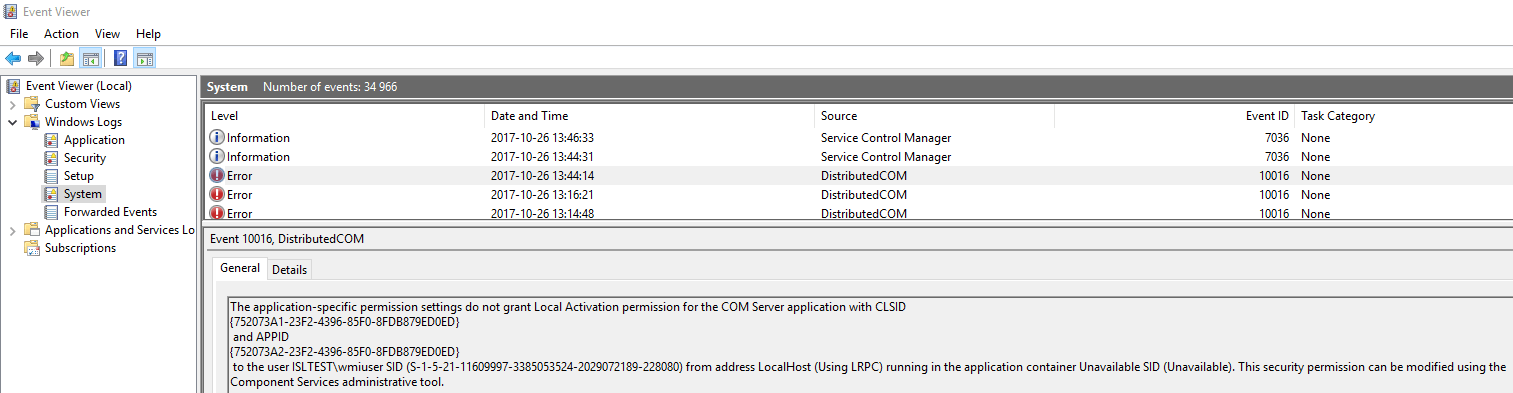
Open up the Event Viewer on the Target system and select Windows Logs -> System. Look for event ID 10016 which occured at the time you attempted to run the PowerShell command to retrieve QFE.
If you find a matching event then we will continue troubleshooting below.
The General tab for the event will say something like below. Don’t worry if the APPID part is missing.
The application-specific permission settings do not grant Local Activation permission for the COM Server application with CLSID
{752073A1-23F2-4396-85F0-8FDB879ED0ED}
and APPID
{752073A2-23F2-4396-85F0-8FDB879ED0ED}
to the user ISL\wmiuser SID (S-1-5-21-XXXXXXXX-XXXXXXXXX) from address LocalHost (Using LRPC) running in the application container Unavailable SID (Unavailable). This security permission can be modified using the Component Services administrative tool.
The description can also look like this if there is no parsing of the ID available. The first ID is the CLSID and the second one is the APPID:
The following information was included with the event:
application-specific
Local
Activation
{752073A1-23F2-4396-85F0-8FDB879ED0ED}
{752073A2-23F2-4396-85F0-8FDB879ED0ED}
ISL
wmiuser
S-1-5-21-XXXXXXXX-XXXXXXXXX
LocalHost (Using LRPC)
What this means is that the user attempted to activate a COM Server application and did not have sufficient privileges to do this. Note the two IDs in the description.
CLSID: {752073A1-23F2-4396-85F0-8FDB879ED0ED}
APPID: {752073A2-23F2-4396-85F0-8FDB879ED0ED} (this one might be missing)
If you only have CLSID in your description then that is fine, we will find the APPID in the registry.
NOTE: These IDs may not be the same on your system. Use your own IDs below.
To find out which application this is we need to go to the registry. Open up the registry with administrator rights by typing in “regedit” into the Run field and then right click and choose “Run as Administrator”.
Do a search for the CLSID in Regedit. You should find a key with the path:
HKEY_CLASSES_ROOT\CLSID\{752073A1-23F2-4396-85F0-8FDB879ED0ED}
In that key you will have a property named AppID. It will read something like:
{752073A2-23F2-4396-85F0-8FDB879ED0ED}
Do a search for this key in the registry. You should find a key with the path:
HKEY_CLASSES_ROOT\AppID\{752073A2-23F2-4396-85F0-8FDB879ED0ED}
It will have a property named LocalService and the value should be TrustedInstaller.
This means that it is TrustedInstaller which the user wmiuser does not have activation or launch rights for. TrustedInstaller is the service that will provide the list of QFE (updates). This is why the output is empty for wmiuser.
To summarize the problem:
- A domain administrator has full access to TrustedInstaller and will be able to read out patch information
- A regular user does not have access to TrustedInstaller so the patch information will be missing
There are a couple of ways to solve this without using a domain administrator:
- Make the domain user a local administrator on the Target system
- Add permissions for the regular user (wmiuser) to access TrustedInstaller
The first option is easy but will make the user an administrator on that particular system. The second option is harder but will not make the user an administrator.
Make the regular user a local administrator
This guide makes the domain non-admin user a local administrator on the Target system. By doing this, the
user receives the same permissions as an domain administrator but limited to the particular machine.
First we must add our user (wmiuser) to a new group which we later will use to make the user a local admin.
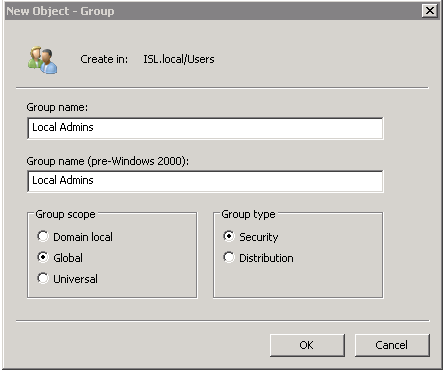
In your domain, add a group named Local Admins:
- Add the WMI User (wmiuser) as a member of Local Admins.
The next step is to create a GPO which will add the Local Admins group as a member of the local administrators group. Open Group Policy Management to create a new GPO.
- Right click Group Policy Objects and select New. Name it “Local Admin” and click OK.
- Right click the Local Admin GPO and select Edit.
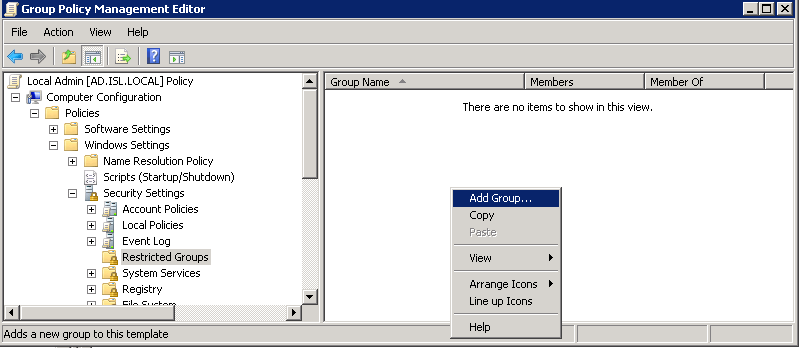
- Expand Computer Configuration -> Policies -> Windows Settings -> Security Settings -> Restricted Groups. Click Add Group…
- Add the Local Admins group we created earlier.
- Under “This group is a member of”, add Administrators.
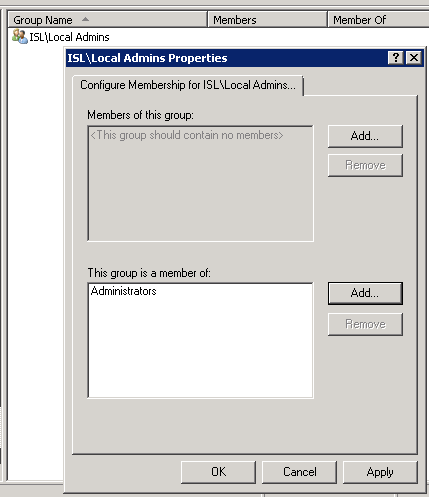
- Click OK to confirm
- Close the GPO editor
Now we must link the GPO to an OU which contains the computers that we want the new GPO to apply on.
- In Group policy management console, right click on the domain or the OU and select Link an Existing GPO
- Select the Local Admin GPO we just created
The GPO should apply on the machines but if you want to force an update, use gpupdate /force on the Target system.
After confirming that the GPO has applied, attempt to run the PowerShell command again (on the Client system):
Get-WmiObject -Class Win32_QuickFixEngineering -ComputerName Target -Credential isl\wmiuser
You should now see the same output as when you executed the command as a domain admin.
If you do not wish to make the user a local administrator, you must continue on reading.
Find the TrustedInstaller application in dcomcnfg
If we need to use a non administrator to access TrustedInstaller we need to perform a set of tasks. Read on for instructions.
On the target system, run dcomcnfg.
- Expand Component Services -> Computers -> My Computer
- Select DCOM Config folder
- Select Detailed view of the folder contents
- Search (scroll down) for the AppID which we found earlier:
{752073A2-23F2-4396-85F0-8FDB879ED0ED}

It should match Trusted Installer Service.
- Right click Trusted Installer Service and select Properties. Select the Security tab.
Your Security page might now look all grayed out without the possibility to click any buttons. This means the current user (Administrator since you logged in to Target with it) does not have permissions to update the settings.
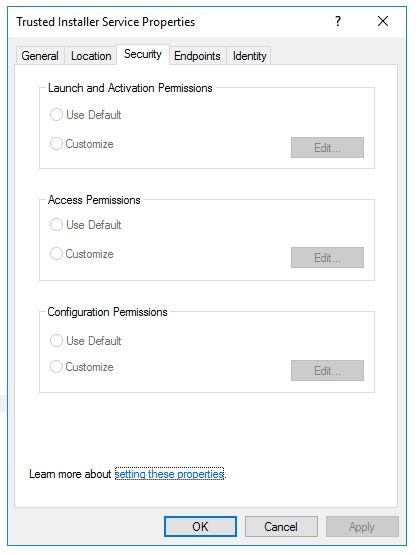
In order to fix this permissions problem we need to go back to regedit. Jump to the section Fix TrustedInstaller service registry key permissions. If your Security page does not look grayed out, jump to Set TrustedInstaller service permissions.
Fix TrustedInstaller service registry key permissions
- Exit the Component Services window completely.
- Open regedit with administrator rights.
- Browse to the key we found earlier matching the AppID. Again, use your own IDs if they are different from what we list here.
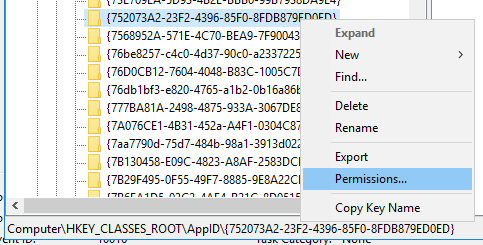
HKEY_CLASSES_ROOT\AppID\{752073A2-23F2-4396-85F0-8FDB879ED0ED} - Right click the key and select Permissions…
- Click Advanced
- At the top where it says Owner: TrustedInstaller, click Change. Do NOT touch any of the permission entries below.
- Enter “Administrator” under “Enter the object name”… and click Check Names. Select the domain administrator user that you are logged in as.
- Click OK. It should now say Owner: ISL\Administrator at the top.
- In the Permission entries below, click the ISL\Administrator entry. Click edit. If it does not exist, click Add and select ISL\Administrator as Principal.
- Make sure Full Control and Basic Permissions are selected.
- Type should be Allow.
- Applies To should be This key and subkeys.
- Click OK.
- Select Replace owner on subcontainers and objects under Owner: ISL\Administrator.
Click OK.
Click OK to close the Permissions window.
Now we open dcomcnfg again to see if we have access to the Security tab. Open the Security tab for TrustedInstaller Service described under Find the TrustedInstaller application in dcomcnfg headline.
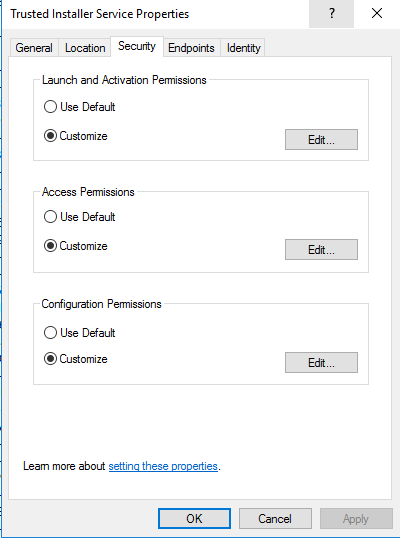
It should no longer be grayed out.
Set TrustedInstaller service permissions
Now we will add launch and access permissions for wmiuser on the TrustedInstaller service. The Security tab should look like this:
- Under Launch and Activation Permissions, click Edit…
- Click Add…
- Type in wmiuser and then click Check Names… Select isl\wmiuser.
- Select all 4 boxes for wmiuser
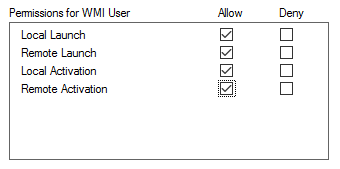
- Click OK
- Under Access Permissions, click Edit…
- Click Add…
- Type in wmiuser and then click Check Names… Select isl\wmiuser
- Select both boxes for wmiuser

- Click OK to close the Trusted Installer Service Properties
Now we need to restart the Trusted Installer service to make sure the changes are applied.
- Type services in the Run field to start the Services application.
- Find Windows Modules Installer service and if it is running, right click and select Restart.
Optional: Restore ownership of the registry key
This is optional but probably good practise: To restore ownership of the registry key to TrustedInstaller we need to find the key for the AppID in the registry restore TrustedInstaller as owner.
- Browse to the key we found earlier matching the AppID. Again, use your own IDs if they are different from what we list here.
HKEY_CLASSES_ROOT\AppID\{752073A2-23F2-4396-85F0-8FDB879ED0ED} - Right click the key and select Permissions…
- Click Advanced
- At the top where it says Owner: ISL\Administrator, click Change.
- Click Locations… and select the local computer (most likely the first entry). Click OK.
- Enter NT SERVICE\TrustedInstaller under “Enter the object name”… and click Check Names. Select TrustedInstaller.
- Click OK. It should now say Owner: TrustedInstaller at the top.
- Select Replace owner on subcontainers and objects under Owner: TrustedInstaller.
- Click OK.
- Click OK to close the Permissions window.
Test access to patch information in WMI after permission updates
Now we have updated the permissions for launching the TrustedInstaller Service so that wmiuser has launch and activation permissions. The final step is to try it out. Open a PowerShell prompt on the Client system and run the following:
Get-WmiObject -Class Win32_QuickFixEngineering -ComputerName Target -Credential isl\wmiuser
You should now get back a list of installed QFE. It should be the same list returned when you ran the command as an administrator.
Source Description HotFixID InstalledBy InstalledOn
------ ----------- -------- ----------- -----------
Target Update KB3192137 NT AUTHORITY\SYSTEM 2016-09-12 00:00:00
Target Update KB3199986 NT AUTHORITY\SYSTEM 2017-01-19 00:00:00
Target Security Update KB3213986 NT AUTHORITY\SYSTEM 2017-01-19 00:00:00
If you still are missing information, make sure that UAC is not filtering the results. See step 5 in Setting up WMI-access through AD & GPO.
Currently we do not have instructions on how to implement these changes through a GPO but if and when we do they will become available here.